General
General Information About This Panel
Welcome to the Primova Employee Panel - your comprehensive workspace designed specifically for Agents, Consultants, and Staff members. This panel provides you with all the tools you need to manage your daily tasks, view property listings, communicate with clients, track your work assignments, and manage your HR-related activities.
Panel Overview:
- Property Access: View all listed properties with complete details, images, and location maps
- Direct Communication: Call property owners directly for enquiries and follow-ups
- Complete Inbox: Fully integrated mail system for internal and external communications
- Task Management: Receive tasks from admin, update status, and add progress notes
- Calendar Integration: Schedule appointments, set reminders, and manage date alerts
- HR Self-Service: View payroll details and submit vacation requests
- Knowledge Base: Access legal pages and FAQ resources (view-only)
- Login Tracking: Monitor your login history and security logs
Your Daily Workflow:
- Morning: Check inbox for new messages and tasks
- Review: View assigned tasks and update progress
- Property Work: Access listings, contact owners, show properties
- Scheduling: Use calendar for appointments and follow-ups
- HR Requests: Submit vacation requests when needed
- Payroll: Check salary details and payment history
- Resources: Access legal documents and FAQs
- Security: Monitor your login history regularly
💡 Quick Start Guide:
- Explore Property Listings: Navigate to Property section to view all available listings
- Check Your Inbox: Stay updated with messages from admin and colleagues
- Review Tasks: See what's assigned to you and update task status
- Manage Calendar: Schedule your appointments and set important reminders
- HR Self-Service: Submit vacation requests and check payroll information
- Access Information: Review legal pages and FAQ for policy questions
Who Uses This Panel:
- Real Estate Agents: View properties, contact owners, manage client appointments
- Property Consultants: Access listings, provide property information to clients
- Staff Members: Complete assigned tasks, communicate with team, manage schedule
- Sales Representatives: Track leads, view available properties, schedule viewings
- Field Agents: Access property details on-the-go, update task progress
Your Permissions:
As an employee (Agent/Consultant/Staff), you have access to:
- View Access: Property listings, legal pages, FAQs, payroll details
- Update Access: Task status updates with notes
- Create Access: Vacation requests, calendar appointments, inbox messages
- Communication: Call property owners, send/receive emails, internal messaging
- Read-Only: Legal documentation, company policies, FAQ knowledge base
My Profile - Complete Profile Management
Comprehensive profile management system where you can view and manage all your personal and professional information. Access and update your personal details, family information, employment records, salary data, address, bank details, insurance information, tax details, upload required documents, and manage third-party integrations. Your complete employee profile in one centralized location with admin-managed sensitive data and employee-editable personal information.
Profile Sections Overview:
- Personal Information: Name, contact, nationality, AHV number, marital status
- Children: Add and manage children details for family allowances
- Employment: Job details, contract information, employment status
- Base Salary Data: Salary structure, monthly/annual salary, pensum percentage
- Address: Complete residential address with all required details
- Bank Details: Bank account information for salary transfer
- Insurance: AHV/ALV, accident insurance, pension, health insurance details
- Withholding Tax: Tax status, code information, residence details
- My Documents: Upload and manage required employment documents
- Integrations: Connect Google Calendar, Outlook, Slack, WhatsApp
Important Profile Notes:
- Admin Managed: Salary, insurance, tax info managed by HR
- Employee Editable: Personal info, children, address, documents
- Information Messages: Blue banners show admin-managed sections
- Save & Continue: Always save changes before leaving section
- Reset Button: Undo changes before saving
- Required Documents: Upload all mandatory documents for compliance
- Accurate Information: Keep all details current and accurate
- Secure Data: Your profile information is confidential
- Contact HR: For changes to admin-managed sections
- Regular Updates: Review and update profile quarterly
👤 1. Personal Information
View and manage your personal details including name, email, phone number, date of birth, gender, nationality, residence permit information, language preference, marital status, and AHV (Swiss Social Security) number. Your email is system-managed and cannot be changed here. All other personal information can be updated and saved. Accurate personal information is essential for HR records, legal compliance, and communication.
Personal Information Form
Complete personal details form showing all your information. Fields include: Name (editable), Email (read-only), Phone Number, Gender (dropdown), Date of Birth (date picker), Nationality (dropdown), Residence Permit Category (dropdown), Settled Permit Valid From date, Language preference, Marital Status (dropdown), and AHV Number (13 digits - Swiss Social Security Number). Save & Continue button to save changes, Reset button to undo. Keep information current for accurate HR records and legal compliance. (Click image to zoom)

- Name: Your full name as per official documents
- Email: System email (cannot be changed here - contact HR if needed)
- Phone Number: Your contact number for official communication
- Gender: Male/Female/Other selection
- Date of Birth: Your birth date (DD/MM/YYYY format)
- Nationality: Your country of citizenship
- Residence Permit: Swiss permit type (Permanent/B/C/L etc.)
- Permit Valid From: Date your settled permit is valid from
- Language: Your preferred communication language
- Marital Status: Single/Married/Divorced/Widowed
- AHV Number: 13-digit Swiss Social Security Number (format: 756.xxxx.xxxx.xx)
👶 2. Children Information
Add and manage information about your children for family allowance purposes. For each child, enter their first name, last name, date of birth, gender, AHV number (13 digits), allowance type (dropdown selection), and monthly allowance amount in CHF. The system displays a blue information banner: "To claim family allowances, the employer must submit an application to the responsible compensation office." Use Add button to add multiple children, Delete button to remove entries. Accurate children information is required for processing family allowances and benefits.
Children Details Form
Add each child's information for family allowance processing. Required fields: First Name, Last Name, Date of Birth (calendar picker), Gender (dropdown), AHV Number (must be 13 digits), Allowance Type (dropdown menu with various allowance categories), Allowance Amount in CHF (monthly amount e.g., 200). Blue Add button to add new child entry, Delete button to remove. Save & Continue to save all children information, Reset to undo changes before saving. (Click image to zoom)

- First Name: Child's first name as per birth certificate
- Last Name: Child's last name/surname
- Date of Birth: Child's birth date for age calculation
- Gender: Select from dropdown (Male/Female)
- AHV Number: Child's 13-digit Swiss Social Security Number
- Allowance Type: Type of family allowance applicable
- Allowance Amount: Monthly allowance in CHF (e.g., 200.00)
- Multiple Children: Use Add button to add more children
- Admin Processing: Information submitted to compensation office by employer
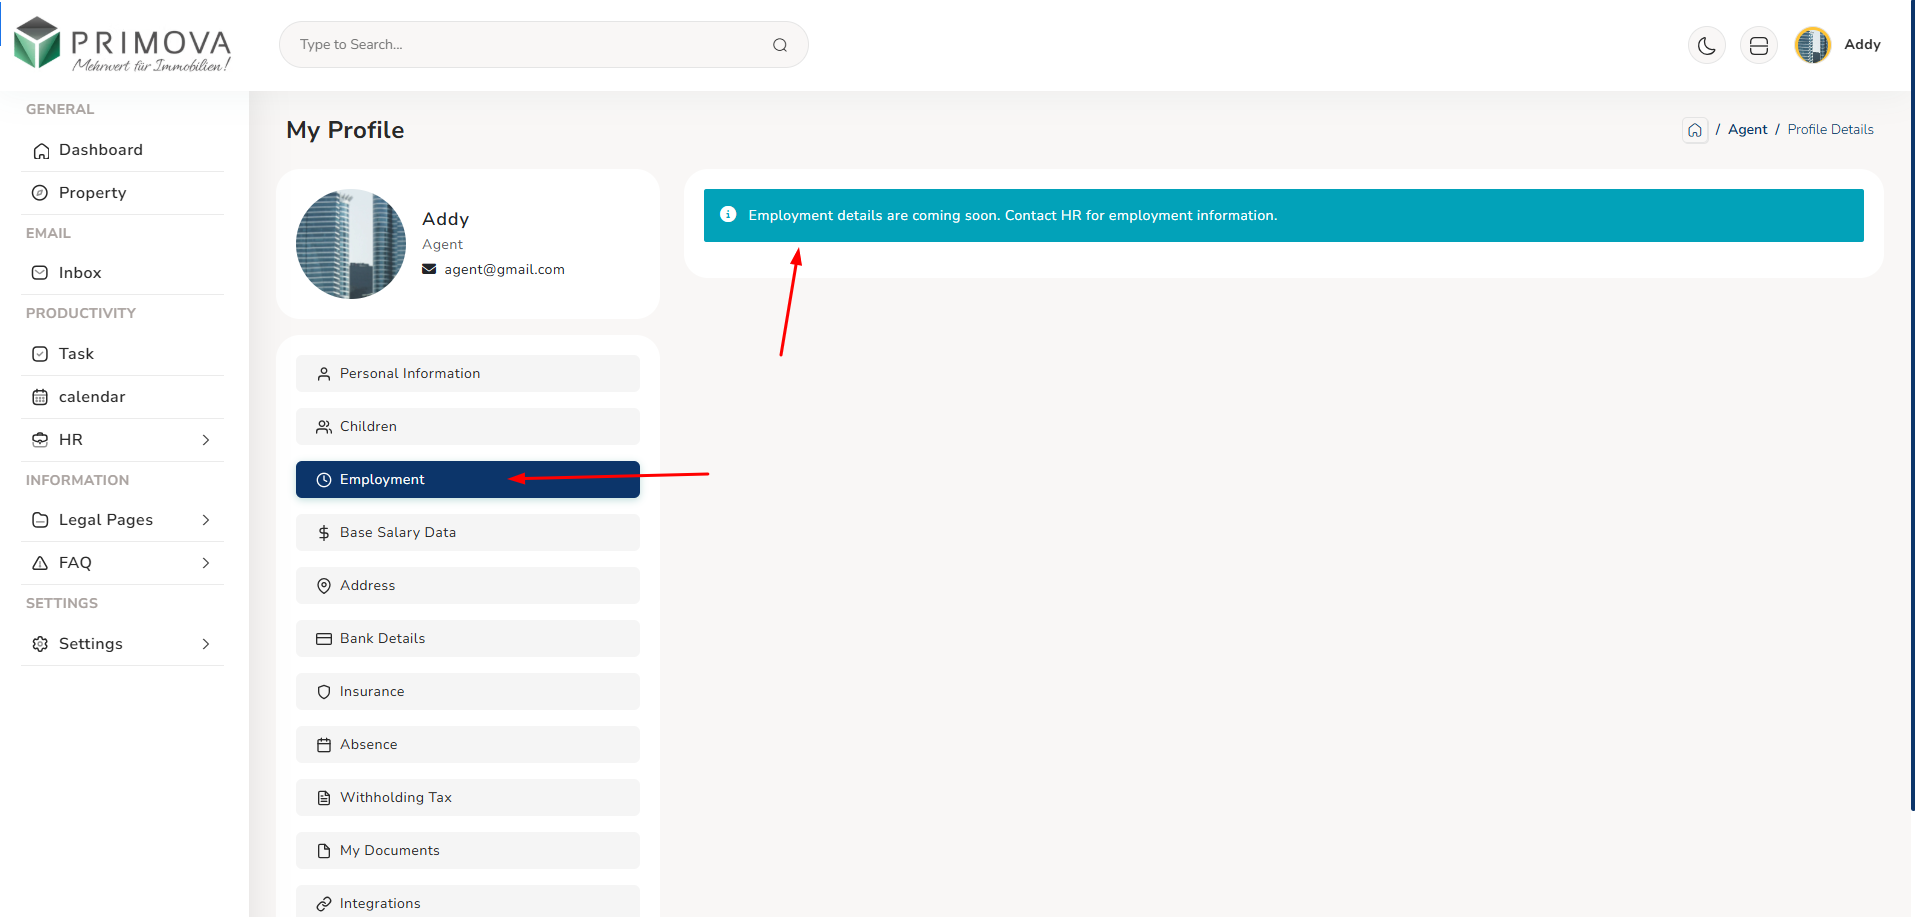
💼 3. Employment Information
View your employment details including job title, department, employment type (full-time/part-time/contract), start date, contract information, reporting manager, and employment status. This section displays a blue information banner: "Employment details are coming soon. Contact HR for employment information." Employment information is managed by HR department and shows your official work assignment, organizational structure, and contract terms. This data is used for organizational charts, reporting relationships, and employment records.
Employment Status
Employment section currently shows informational message that details are coming soon. When available, this section will display: Job Title/Position, Department/Division, Employment Type (Full-time/Part-time/Contract/Temporary), Contract Start Date, Contract End Date (if applicable), Probation Period status, Reporting Manager name, Direct Reports (if any), Work Schedule/Shift, Employment Status (Active/On Leave/Suspended). All employment information is managed and updated by HR department. (Click image to zoom)
- Job Title: Your official designation/position
- Department: The department/division you work in
- Employment Type: Full-time, Part-time, Contract, Temporary
- Start Date: Your employment commencement date
- Contract Terms: Fixed-term or permanent contract
- Reporting Manager: Your direct supervisor/manager
- Work Location: Primary office/work location
- Status: Active employment status
- HR Managed: Contact HR for any employment information changes
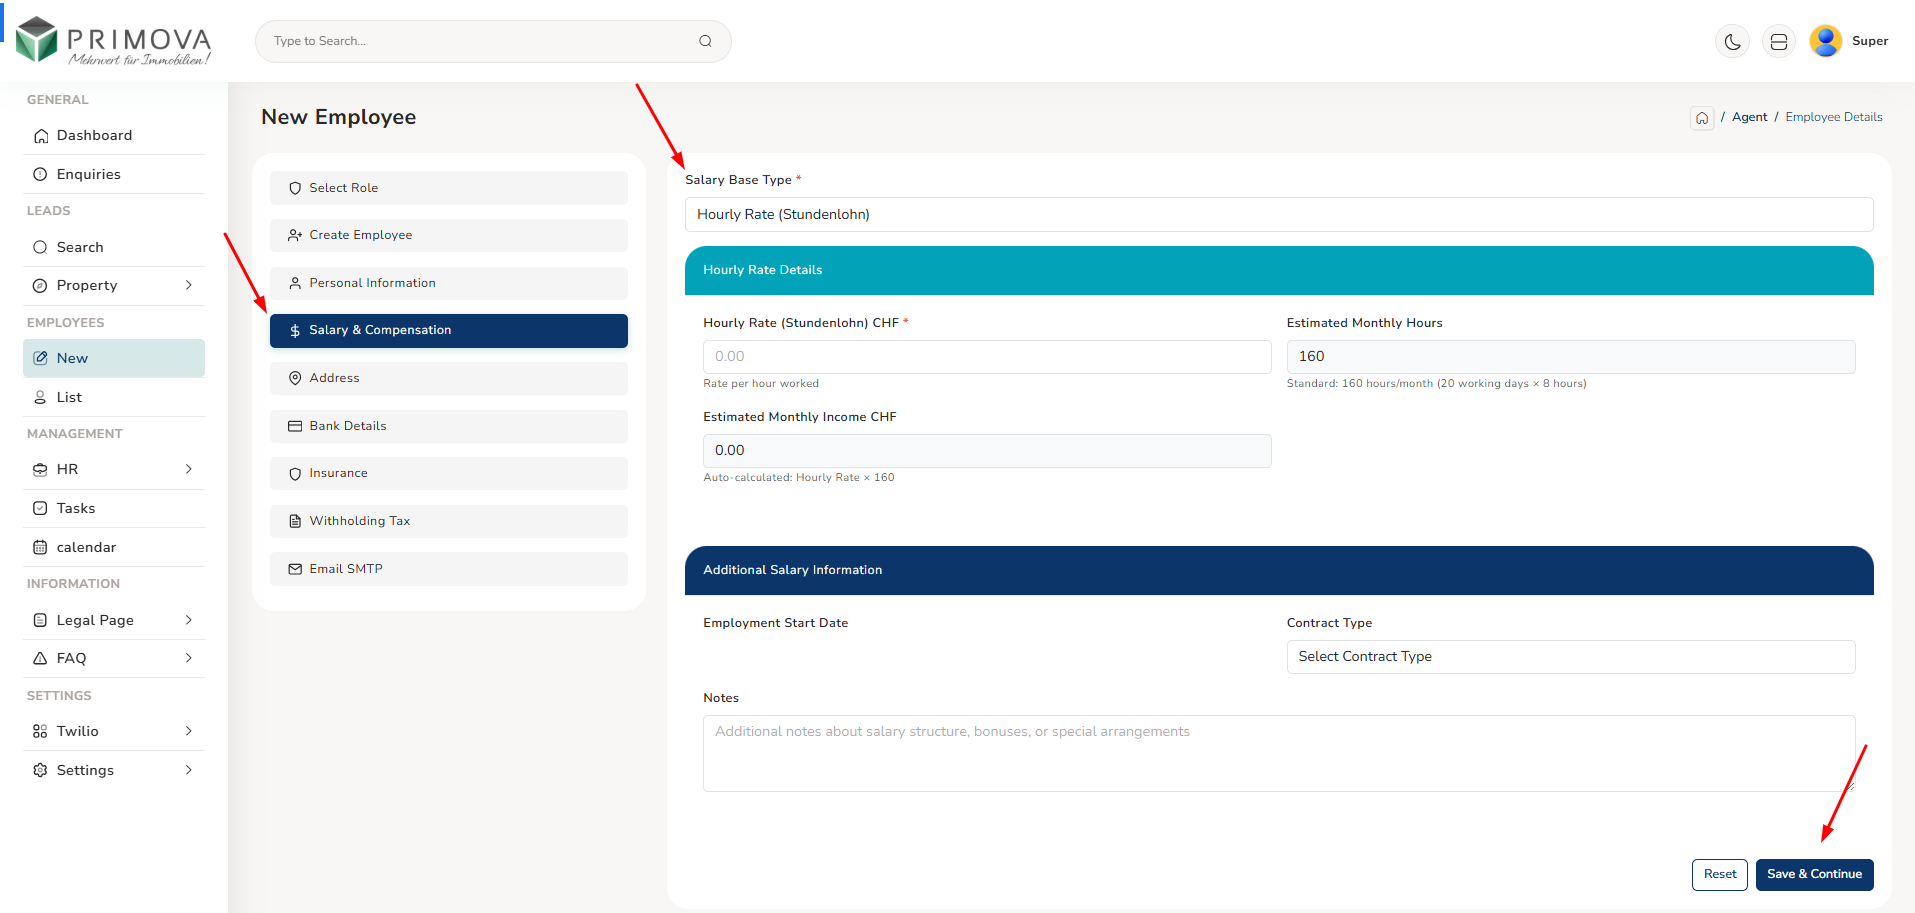
💰 4. Base Salary Data
View your base salary structure and compensation details. This section shows a blue information banner: "Salary information is managed by your administrator. Contact HR if you have questions about your compensation." Displays your Salary Type (Fixed/Variable/Commission-based), Monthly Salary in CHF, Pensum percentage (work percentage like 100%, 80%, 60%), Annual Salary in CHF, and checkbox for "Include 13th Month Salary" if applicable. Salary data is managed by HR and payroll departments. For salary questions, adjustments, or discrepancies, contact HR directly.
Salary Structure Details
Salary structure form (read-only for employees, HR-managed). Shows: Salary Type field (Fixed/Variable/Commission), Monthly Salary (CHF) - your gross monthly salary amount, Pensum (%) - your work percentage (100% = full-time, 80% = 4 days/week, etc.), Annual Salary (CHF) - calculated yearly gross salary, checkbox for "Include 13th Month Salary" (common in Switzerland - additional month's salary paid annually). Back to Profile button returns to main profile view. All salary information is confidential and managed by HR/Payroll department. (Click image to zoom)
- Salary Type: Fixed (stable monthly) / Variable (performance-based) / Commission
- Monthly Salary: Your gross monthly salary before deductions (e.g., 10,000.00 CHF)
- Pensum %: Work percentage (100% = full-time, 50% = half-time) - affects salary calculation
- Annual Salary: Yearly gross salary (Monthly × 12 or × 13 if 13th month included)
- 13th Month Salary: Common Swiss benefit - additional month's salary paid in December/divided across year
- Gross Salary: Amount before tax and social security deductions
- HR Contact: For salary questions, raise requests, or concerns
- Confidential: Salary information is private - don't share with colleagues
- Regular Review: Salary typically reviewed annually during performance review
🏠 5. Address Information
Manage your complete residential address details. All fields are editable and should be kept current for official correspondence, emergency contact, and legal requirements. Required information includes: Address Line 2/Additional Line (e.g., c/o, apartment details), Street name, House Number, P.O. Box (if applicable), Region/Province/State/Locality, Postal Code (ZIP), City/Town name, Canton (for Switzerland - dropdown select), Municipality Number, and Country (dropdown select). Use Save & Continue button to save changes, Reset button to undo before saving. Accurate address is essential for payroll, tax documents, and official communication.
Complete Address Form
Comprehensive address entry form with all required fields. Address Line 2 for additional details (e.g., "c/o" or "10 Downing Street"), Street field (e.g., "downing street"), House Number (e.g., "69"), P.O. Box for postal box number if used (e.g., "143"), Region/Province field (e.g., "Fear"), Postal Code/ZIP (e.g., "SW1A 2AA"), City/Town (e.g., "Fatih"), Canton dropdown for Swiss cantons (e.g., "Schwyz (SZ)"), Municipality Number (e.g., "12345678"), Country dropdown (e.g., "Switzerland"). Saves residential address for all official purposes. (Click image to zoom)

- Address Line 2: Additional address info (apartment no., floor, c/o details)
- Street: Street name where you reside
- House Number: Building/house number
- P.O. Box: Postal box number (if you have one)
- Region/Province: State/province/region within country
- Postal Code: ZIP/Postal code for mail delivery
- City/Town: Municipality/city name
- Canton: Swiss canton (if in Switzerland) - affects tax
- Municipality Number: Official municipality identification number
- Country: Country of residence
- Update Immediately: Inform HR immediately if you move/change address
- Affects: Tax jurisdiction, emergency contact, official mail, payroll
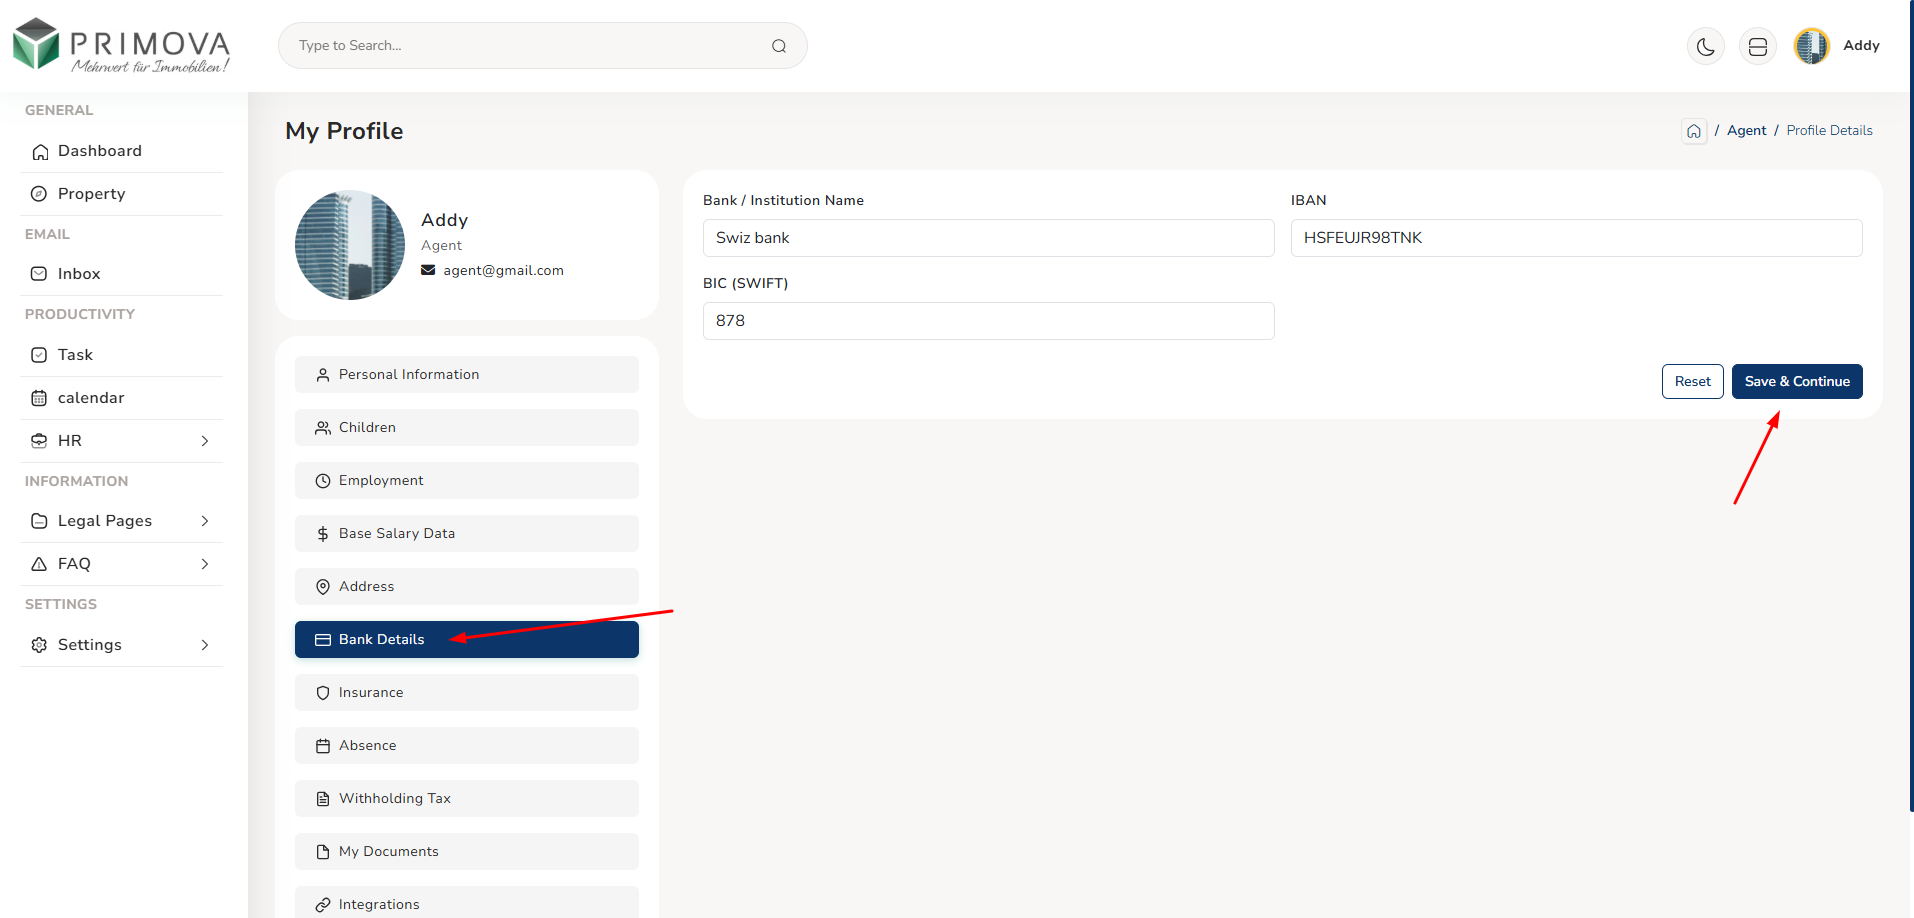
🏦 6. Bank Details
Manage your bank account information for salary transfer. Enter your Bank/Institution Name (e.g., "Swiz bank"), IBAN (International Bank Account Number - e.g., "HSFEUIR98TNK"), and BIC/SWIFT code (e.g., "878"). This information is used by payroll department to transfer your monthly salary. Ensure bank details are accurate to avoid salary payment delays. Use Save & Continue button to save bank information, Reset to undo changes. If you change banks, update this information immediately and inform HR to prevent payment issues. Bank details are confidential and securely stored.
Bank Account Information
Bank details form for salary transfer setup. Three required fields: Bank/Institution Name - enter your bank's full name (e.g., "Swiz bank", "UBS", "Credit Suisse"), IBAN field - International Bank Account Number, usually starts with country code, 16-34 characters (e.g., "HSFEUIR98TNK" format varies by country), BIC (SWIFT) field - Bank Identifier Code, 8-11 characters identifying your bank internationally (e.g., "878" or "UBSWCHZH80A"). Save & Continue saves bank details for payroll, Reset undoes unsaved changes. Critical for receiving monthly salary payments. (Click image to zoom)
- Bank Name: Full official name of your banking institution
- IBAN: International Bank Account Number - unique account identifier (check bank statement for correct format)
- BIC/SWIFT: Bank Identifier Code - international bank identification (8-11 character code)
- Salary Transfer: This account receives your monthly net salary payment
- Verification: Double-check all numbers to avoid payment errors
- Bank Change: Update immediately if you change banks - notify HR as well
- Payment Schedule: Salary typically paid 25th-28th of each month
- Processing Time: Changes take 1-2 pay cycles to take effect
- Security: Bank details stored securely, accessed only by payroll department
- Confirmation: You'll receive email confirmation after payroll processes your salary
🛡️ 7. Insurance Information
View your comprehensive insurance coverage details managed by HR. This section displays a blue information banner: "Insurance information is managed by your administrator. Contact HR if you need to make changes." Contains four main insurance categories: AHV/ALV Contribution Requirement (social security), Accident Insurance (UVG), Occupational Pension (BVG), and Compensation Fund & Additional Insurance. Each category shows applicable selections, provider names, codes, contribution amounts, and enrollment status. Insurance information is typically set up during onboarding and reviewed annually.
Insurance Coverage Details
Complete insurance information display (HR-managed). Sections include: AHV/ALV Contribution: Exempt from AHV (low-income salary) dropdown, AHV contributions in retirement age selection. Accident Insurance (UVG): UVG Provider field (e.g., "Not configured"), Code field (e.g., "B1"). Occupational Pension (BVG): Enrolled status checkbox, BVG Provider/Plan (e.g., "Not configured"), Employee Contribution CHF (e.g., "0.00"), Employer Contribution CHF (e.g., "0.00"). Compensation Fund: UVGZ Insurances ("None"), KTG Insurances ("None"), AHV Compensation Fund ("Not configured"). Back to Profile button returns. All managed by HR. (Click image to zoom)

- AHV (Alters- und Hinterlassenenversicherung): Swiss Old Age and Survivors Insurance - mandatory social security
- ALV (Arbeitslosenversicherung): Unemployment Insurance - contributes to unemployment benefits
- UVG (Unfallversicherung): Accident Insurance - covers work and non-work accidents
- BVG (Berufliche Vorsorge): Occupational Pension - mandatory for salaries above threshold
- KTG (Krankentaggeld): Daily Sickness Allowance - income protection during illness
- UVGZ: Additional accident insurance coverage
- Provider: Insurance company providing each coverage type
- Contributions: Shows employee and employer contribution amounts
- Codes: Insurance codes for administration and billing
- Enrollment: Indicates which insurances you're enrolled in
- Legal Requirement: Many insurances are legally mandatory in Switzerland
- Annual Review: Insurance typically reviewed during annual enrollment period
- HR Contact: For questions, changes, or claims - contact HR department
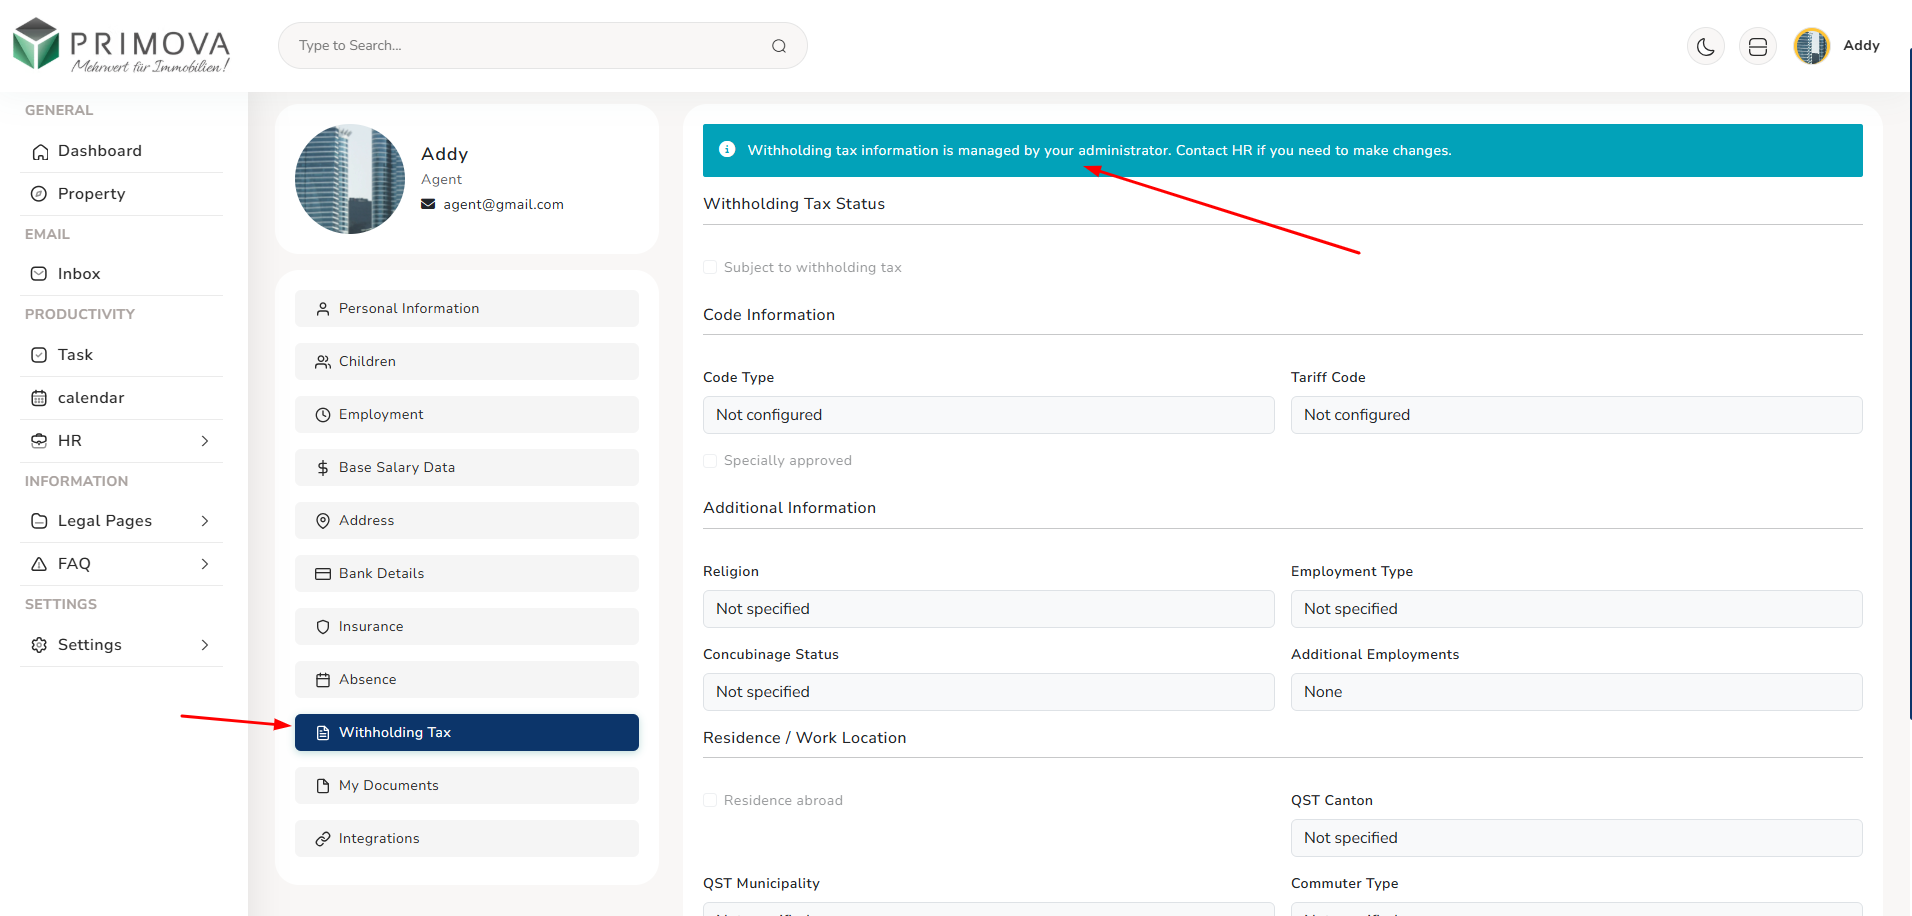
📑 8. Withholding Tax Information
View your withholding tax status and configuration managed by HR. Displays blue information banner: "Withholding tax information is managed by your administrator. Contact HR if you need to make changes." Shows Withholding Tax Status (Subject to withholding tax / Not subject), Code Information section with Code Type and Tariff Code fields (e.g., "Not configured"), and Additional Information section including Region, Employment Type, Concubinage Status, Additional Employments, Residence/Work Location fields, QST Canton, QST Municipality, and Commuter Type. Withholding tax applies to foreign workers without Swiss residence permit C. All managed by HR and tax compliance department.
Tax Status Information
Withholding tax configuration display (HR-managed, read-only for employees). Tax Status: "Subject to withholding tax" checkbox - applicable if you're foreign national without permit C. Code Information: Code Type (e.g., "Not configured"), Tariff Code (e.g., "Not configured") - determines tax rate. Additional Information: Region (e.g., "Not specified"), Employment Type (e.g., "Not specified"), Concubinage Status (living with partner without marriage), Additional Employments (other jobs that affect tax), Residence abroad checkbox, QST Canton (Quellensteuertarif - canton for tax), QST Municipality, Commuter Type. All fields impact tax calculation. HR manages based on your situation. (Click image to zoom)
- Withholding Tax: Direct tax deduction from salary for certain foreign workers
- Applicability: Usually applies to B/L permit holders, not Swiss nationals or C permit holders
- Code Type: Determines tax calculation method based on your situation
- Tariff Code: Specific tax rate code applied to your salary
- QST (Quellensteuer): Source tax - tax withheld at source (from salary)
- Region: Your residence region affects tax rate
- Employment Type: Full-time/part-time affects tax calculation
- Concubinage: Living with partner affects tax status
- Additional Employment: Multiple jobs require combined income tax calculation
- Canton: Canton of residence determines tax jurisdiction and rates
- Municipality: Municipality-level tax variations
- Commuter: Cross-border commuters have special tax arrangements
- Annual Adjustment: Tax may be adjusted based on actual income at year-end
- Tax Certificate: Annual certificate provided for tax declaration
- Changes: Notify HR immediately if marital status, residence, or employment changes
📄 9. My Documents
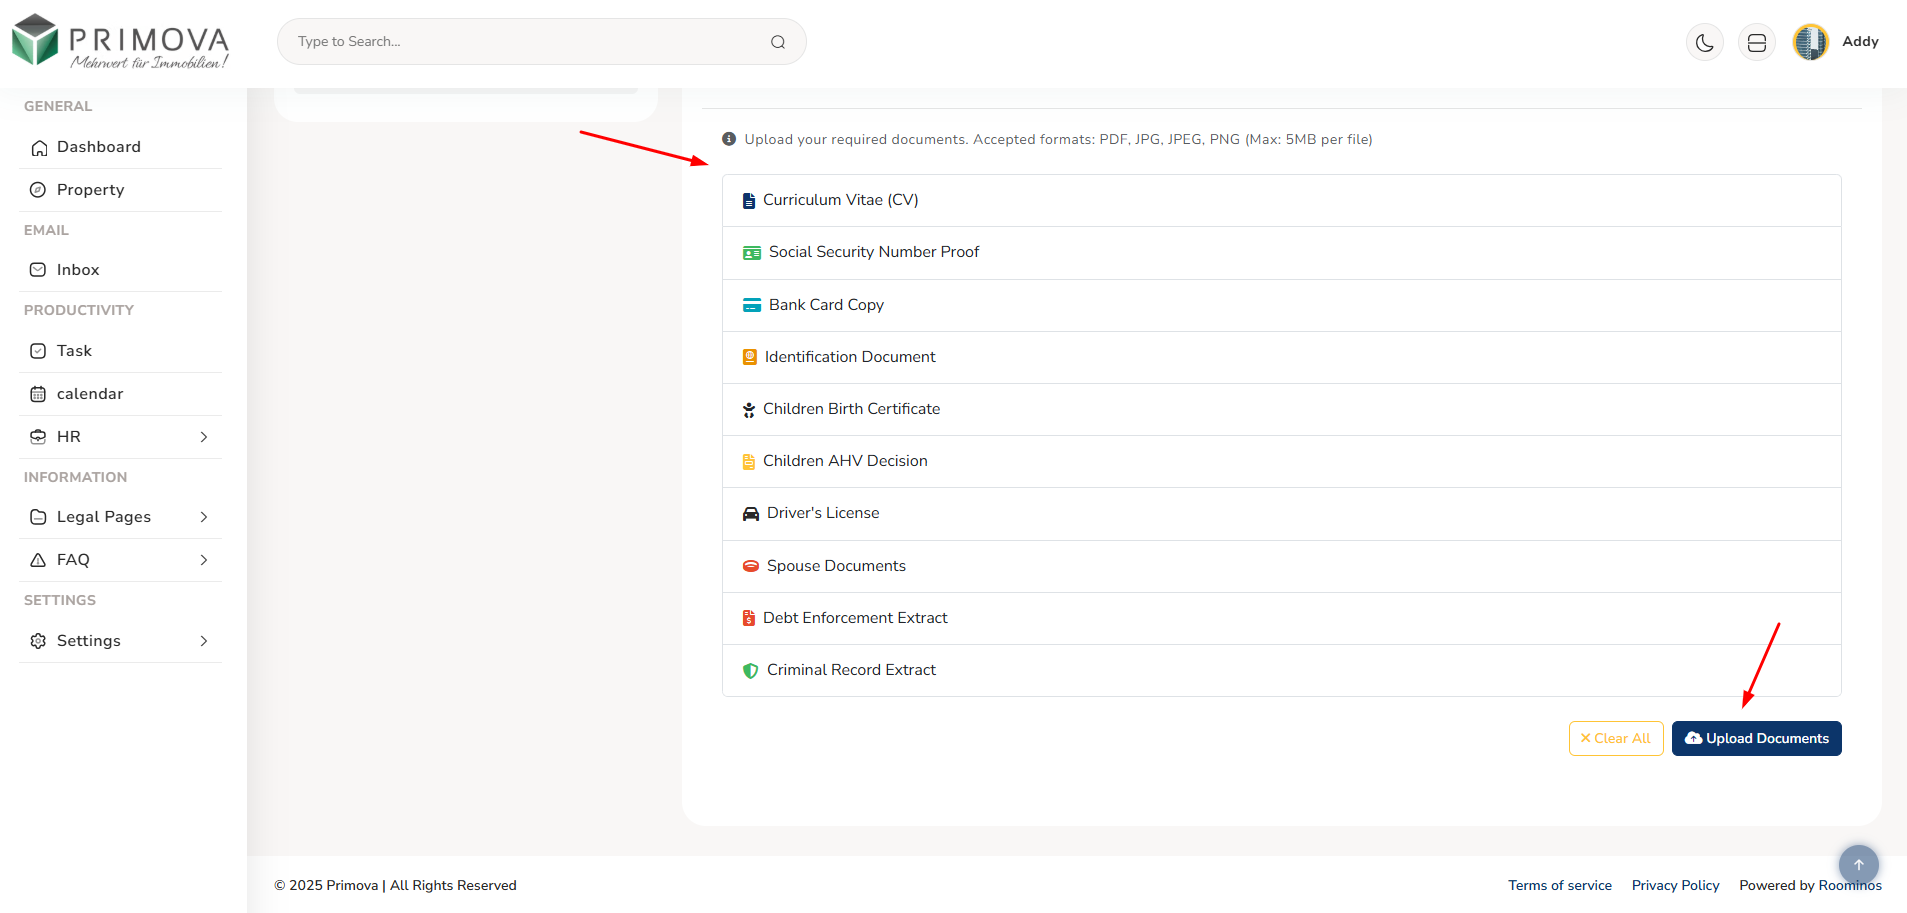
Upload and manage all required employment documents. System displays information banner: "Upload your required documents. Accepted formats: PDF, JPG, JPEG, PNG (Max: 5MB per file)." Required document types include: Curriculum Vitae (CV), Social Security Number Proof, Bank Card Copy, Identification Document (passport/ID), Children Birth Certificate, Children AHV Decision, Driver's License, Spouse Documents, Debt Enforcement Extract, Criminal Record Extract. After upload, view document dashboard showing Total Files count, PDF Files count, Images count, and Active documents. Each uploaded document shows category badge, file type icon, upload date, file size, and action buttons (View, Download, Delete). Use Upload Documents button to add files, Clear All to remove all.
Document Upload Interface
Document upload screen showing all document categories with colored icons. Document Types: 🔵 Curriculum Vitae (CV) - your resume/CV, 🟢 Social Security Number Proof - AHV number verification document, 💳 Bank Card Copy - bank account verification, 🟠 Identification Document - passport or national ID card, 👶 Children Birth Certificate - for each child (family allowances), 📋 Children AHV Decision - child's social security registration, 🚗 Driver's License - if driving is job requirement, 💑 Spouse Documents - partner's documents if applicable, 🔴 Debt Enforcement Extract - financial clearance certificate, 🟢 Criminal Record Extract - background check document. Click Upload Documents button (blue, top-right) to open file selector. Clear All button to remove all uploads. (Click image to zoom)
My Documents Dashboard
After uploading, see documents dashboard with colorful metric cards: 🔵 Total Files card shows total count (e.g., "1"), 🔴 PDF Files card shows PDF count (e.g., "0"), 🔵 Images card shows image count (e.g., "1"), 🟢 Active card shows active documents (e.g., "1"). Below cards, "My Documents" section lists all uploaded documents with: Document name as header (e.g., "Driver's License"), Category badge (e.g., "🔵 Drivers license"), File type badge (e.g., "📁 Image"), Upload date (e.g., "📅 Dec 25, 2025"), File size (e.g., "💾 182.66 KB"), Action buttons row with 🔵 View (eye icon), 🟢 Download (download icon), 🟠 Delete (refresh icon). Search box to find documents. Upload Documents button top-right to add more files. (Click image to zoom)

- Mandatory Documents: CV, ID, Social Security Proof, Bank Card - required for all employees
- Conditional Documents: Children certificates only if you have children, Driver's License only if driving required
- Compliance Documents: Debt Enforcement and Criminal Record extracts for certain positions
- File Formats: Accepted - PDF (best for text documents), JPG/JPEG/PNG (for scanned documents/photos)
- File Size: Maximum 5MB per file - compress large files if needed
- Quality: Ensure documents are clear, readable, and not blurred
- Validity: Some documents expire (ID, permit) - upload renewed versions
- Organization: Keep digital copies organized in personal backup as well
- View: Click View button to see document in viewer before downloading
- Download: Download button to save document copy to your device
- Delete: Delete button removes document (be careful - permanent action)
- Search: Use search box to quickly find specific documents by name
- HR Access: HR department can view your uploaded documents for verification
- Completion: Profile shows incomplete until all mandatory documents uploaded
- Updates: Re-upload if document expires or information changes
🔗 10. Integrations
Connect your favorite third-party applications to streamline your workflow. Integration section shows banner: "Connect Your Tools - Integrate your favorite applications to streamline your workflow. Enable or disable integrations as needed." Available integrations include: Google Calendar (sync appointments and schedule, shows Connected status with green dot and connected email, Manual Sync with "Sync Now" button, Disconnect button to unlink, Advanced Settings gear icon), Microsoft Outlook (sync with Outlook Calendar and Email, shows "Not Configured" status with orange dot), Slack (receive notifications and updates in Slack, "Coming Soon" status), WhatsApp Business (send messages and notifications via WhatsApp, "Coming Soon" status). Each integration can be enabled/disabled, connected accounts shown, with Sync Now and Disconnect options.
Integration Management Panel
Integrations interface showing available third-party connections. Google Calendar: 📅 icon, "Sync your appointments and schedule" description, 🟢 Connected badge (green dot), shows "Connected Account: user@gmail.com", Enable/disable sync toggle, Manual Sync section with "Sync Now" button (blue, with sync icon), Disconnect button (red, with X icon) to unlink, ⚙️ Advanced Settings expandable section. Microsoft Outlook: 📧 icon, "Sync with Outlook Calendar and Email", 🟠 Not Configured (orange dot). Slack: 💬 icon, "Receive notifications and updates in Slack", 🟡 Coming Soon status (orange dot). WhatsApp Business: 💚 icon, "Send messages and notifications via WhatsApp", 🟡 Coming Soon (orange dot). Top banner in cyan with info icon. (Click image to zoom)

- Purpose: Integrations sync Primova data with external apps you use daily
- Google Calendar: Automatically sync calendar appointments both ways - create in Primova, see in Google Calendar and vice versa
- Sync Now: Manual sync button force-syncs immediately instead of waiting for automatic sync
- Connected Account: Shows which Google/Outlook account is linked
- Disconnect: Unlinks the integration - use if changing accounts or no longer needed
- Advanced Settings: Configure sync direction, which calendars to sync, conflict resolution
- Microsoft Outlook: Similar to Google Calendar but for Outlook users - syncs email and calendar
- Slack Integration: Receive Primova notifications in Slack channels - task assignments, messages, updates
- WhatsApp Business: Send automated messages to clients, receive notifications via WhatsApp
- Coming Soon: Integration under development - will be available in future updates
- Security: OAuth authentication - Primova doesn't store your external app passwords
- Permissions: Review requested permissions when connecting apps
- Enable/Disable: Toggle integrations on/off without disconnecting
- Multiple Accounts: Some integrations support multiple account connections
- Productivity Boost: Integrations reduce manual work and keep everything in sync
💡 Profile Management Best Practices:
- Complete Profile: Fill out all sections fully for HR compliance and smooth operations
- Accurate Information: Ensure all data is current, correct, and matches official documents
- Regular Updates: Review and update profile at least quarterly or when information changes
- Document Upload: Upload all mandatory documents as soon as requested
- Quality Scans: Ensure uploaded documents are clear, readable, and properly oriented
- Save Changes: Always click Save & Continue before leaving a section
- Address Changes: Update address immediately when you move - affects tax and mail
- Bank Changes: Update bank details and inform HR 1 month before salary payment date
- Children Updates: Add children immediately for family allowance processing
- Integration Setup: Connect Google Calendar/Outlook for better workflow
- Document Renewal: Re-upload when documents expire (ID, permits, licenses)
- Contact HR: For admin-managed sections (salary, insurance, tax), contact HR for changes
- Privacy: Your profile data is confidential and securely stored
- Verification: HR may ask to verify documents in person occasionally
⚠️ Profile Important Notes:
- Admin-Managed Sections: Salary, employment, insurance, and tax info cannot be edited by employees
- Blue Information Banners: Indicate sections managed by administrator - contact HR for changes
- Email Cannot Change: System email is fixed - contact IT support if email change needed
- AHV Number Format: Must be exactly 13 digits in correct Swiss social security format
- Document Size Limit: Each file maximum 5MB - compress if larger
- Accepted Formats: Only PDF, JPG, JPEG, PNG - other formats rejected
- Bank Details Critical: Wrong IBAN means salary payment failure - verify carefully
- Address Affects Tax: Canton and municipality determine tax rates - update immediately if moved
- Children Documentation: Birth certificates and AHV decisions required for allowance processing
- Integration Permissions: Review what permissions apps request before connecting
- Reset Button: Undoes changes only before saving - after saving, changes are permanent
- Profile Completion: Incomplete profiles may affect payroll processing, allowances, or compliance
- Legal Compliance: Accurate profile information required by Swiss employment law
- HR Verification: HR department reviews profiles for accuracy and completeness
Property - View Listed Properties
Access comprehensive property listings with all the information you need to assist clients. View detailed property information, browse through property images, contact property owners directly for enquiries, and check property locations on Google Maps. Each property listing includes complete details to help you answer client questions effectively.
Key Features:
- View all listed properties with complete details and specifications
- Browse property images gallery (3 images per property minimum)
- Direct call functionality to contact property owners for enquiries
- Integrated Google Maps to check exact property location
- Property type, size, price, and availability status
- Property description, amenities, and special features
- Owner contact information (name, phone, email)
- Property address with neighborhood details
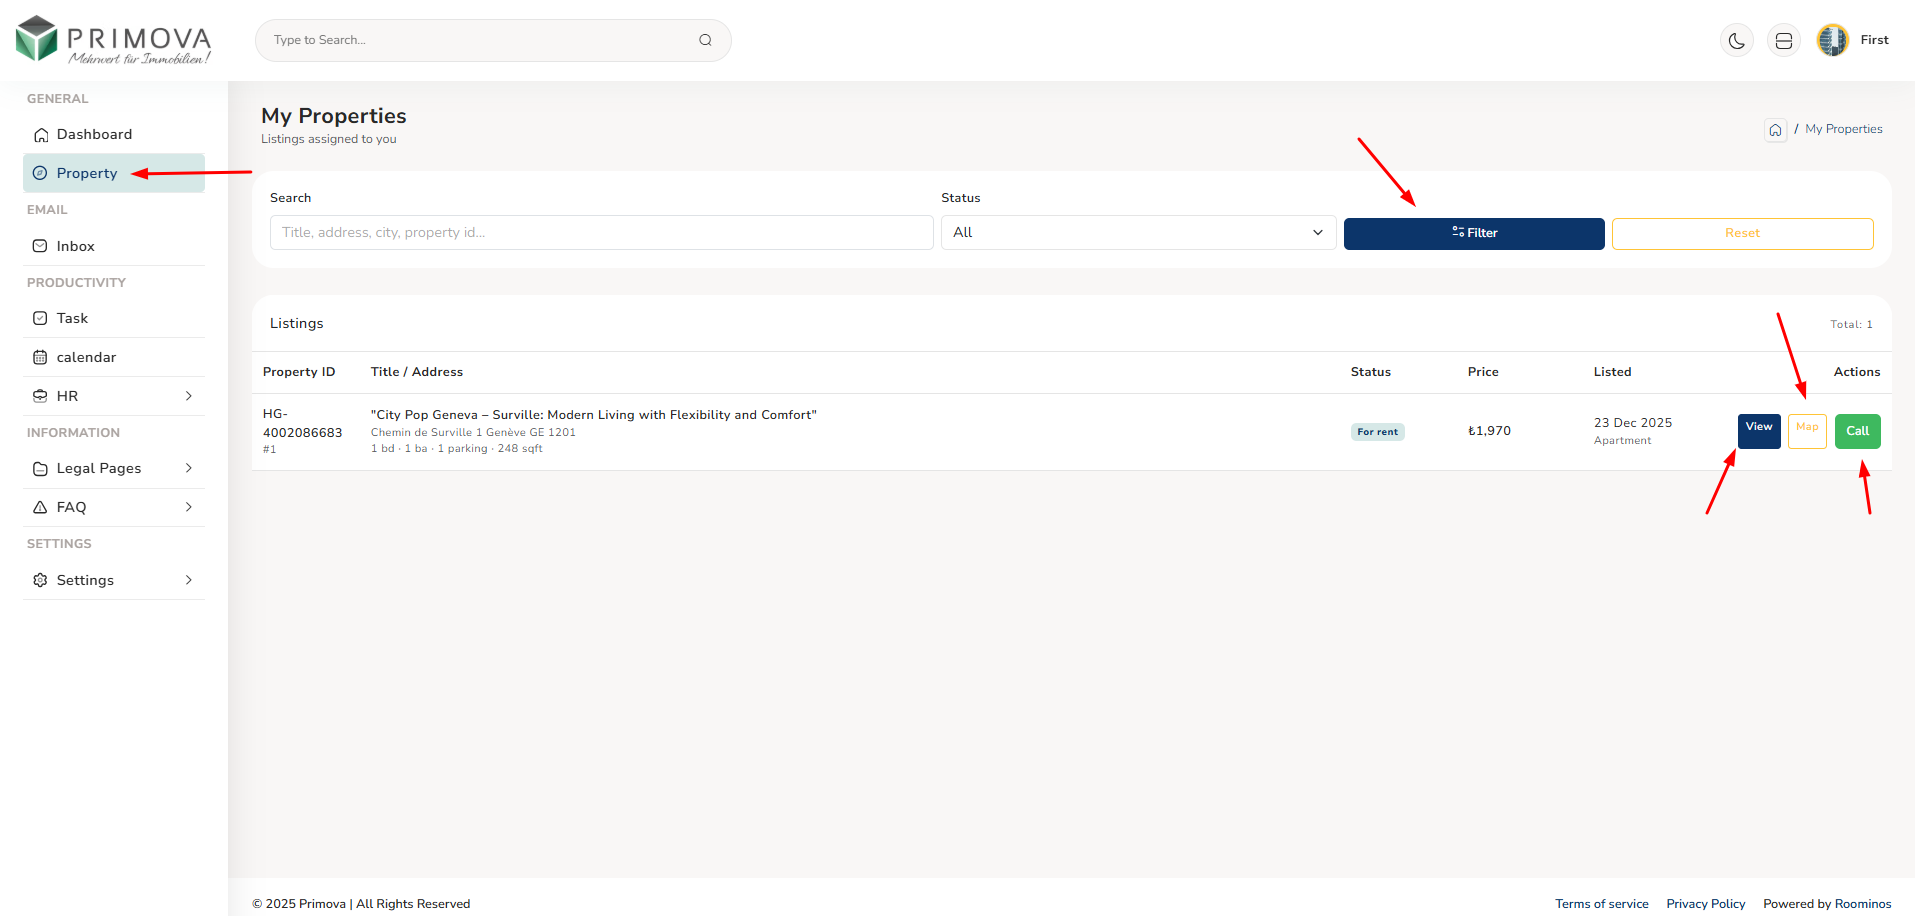
Property List - All Available Listings
View all active property listings in a clean, organized format. Each property card shows key information including property image, title, location, price, type, size, and quick action buttons to view full details, call the owner, or check location on map. Perfect for quickly browsing available properties to match with client requirements. (Click image to zoom)
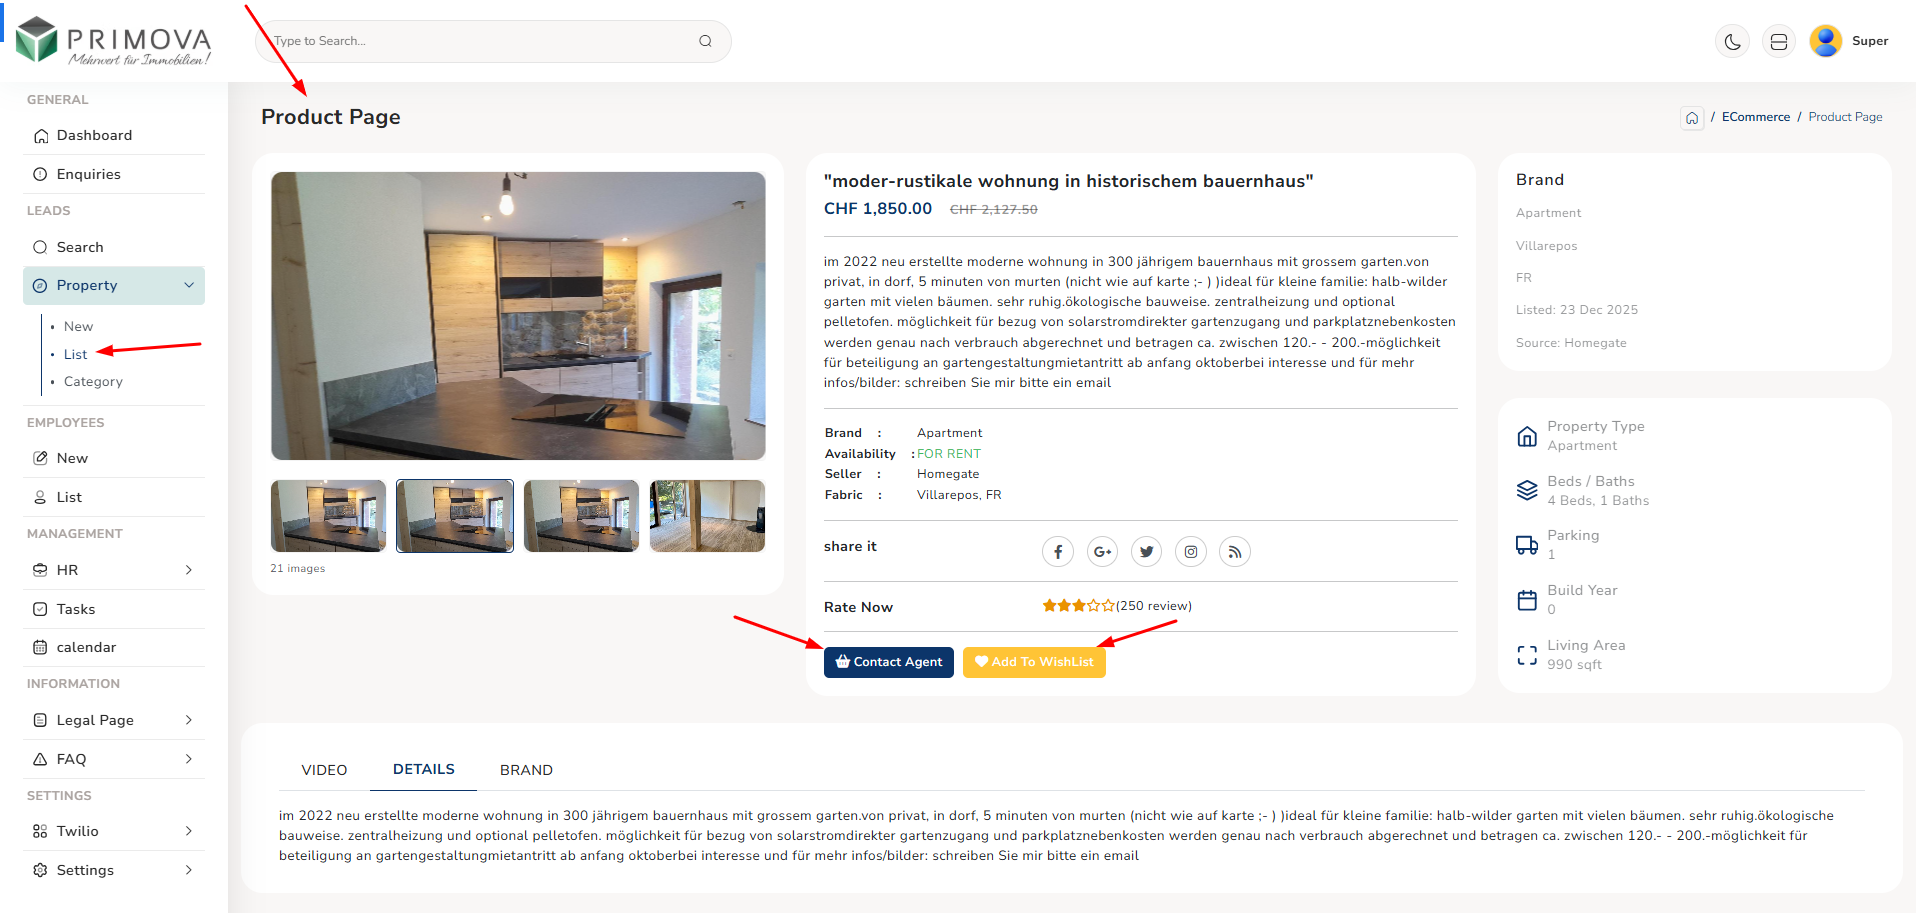
Property Details - Complete Information
View comprehensive property details including description, specifications, amenities, and pricing. See all property images in a gallery format, owner contact information with direct call button, and key property features. Everything you need to present the property to potential clients. (Click image to zoom)
Property Location - Google Maps Integration
Check exact property location on Google Maps with a single click. View the property's neighborhood, nearby amenities, transport links, and surrounding area. Help clients understand the property's location advantage and accessibility. The map shows precise property coordinates for accurate location verification. (Click image to zoom)

Property Information Includes:
- Basic Details: Title, type, price, availability
- Specifications: Size (sqm), bedrooms, bathrooms
- Location: Full address, neighborhood, city
- Images: Property photos (minimum 3 images)
- Owner Info: Name, phone number, email
- Description: Detailed property description
- Features: Amenities and special features
- Map: Google Maps location pin
✅ How to Work With Properties:
- Browse Listings: Scroll through available properties to find matches for your clients
- View Details: Click on any property to see full information and images
- Review Images: Check all property photos (gallery of 3+ images)
- Check Location: Use the map feature to verify property location and surroundings
- Contact Owner: Use the direct call button to reach property owner for enquiries
- Gather Information: Ask owner about viewing appointments, special conditions, or negotiations
- Schedule Viewing: Arrange property viewings with clients after owner confirmation
- Follow Up: Update admin on property interest and client feedback
Best Practices for Property Work:
- Always Verify: Check property availability with owner before scheduling viewings
- Be Prepared: Review all property details before calling the owner
- Professional Communication: Introduce yourself and company when contacting owners
- Use Maps: Familiarize yourself with property location before client meetings
- Take Notes: Record important information from owner conversations
- Update Admin: Report client interest and property enquiries promptly
- Client Matching: Use property filters to find best matches for client needs
- Stay Current: Check for new listings regularly to expand your options
⚠️ Important Notes:
- View Only: You can view properties but cannot edit or delete listings
- Owner Contact: Always be professional when calling property owners
- Confidentiality: Keep owner information and property details confidential
- Accuracy: Report any incorrect property information to admin immediately
- Client Privacy: Don't share client information with owners without permission
- Map Accuracy: Verify exact location with owner if map pin seems incorrect
Inbox
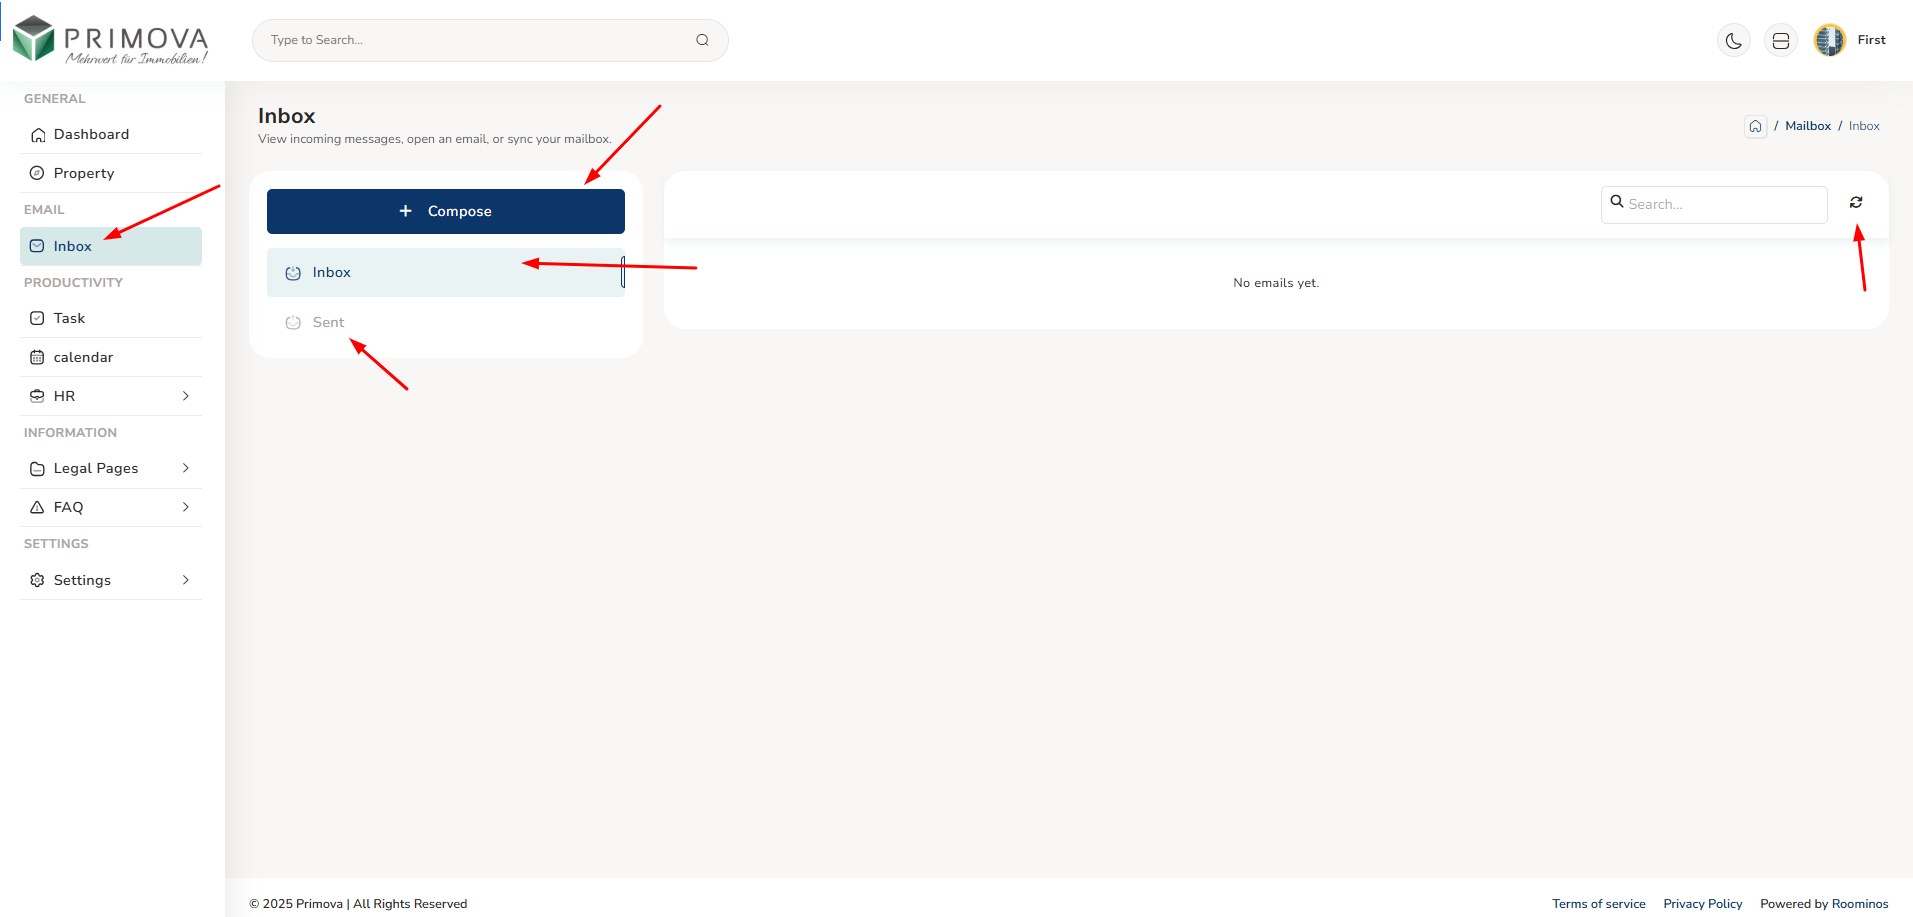
Complete Mail System
Fully integrated internal email system for seamless communication with admin, colleagues, and team members. Send, receive, read, and manage all your work-related emails within the Primova platform. Stay connected with your team, receive task notifications, get updates from management, and communicate efficiently without leaving the system.
Key Features:
- Complete inbox with received emails list and message preview
- Compose and send new emails to admin and team members
- Read full email messages with sender details and timestamps
- Reply to received emails directly from the message view
- Search emails by sender name, subject, or message content
- Filter emails by date range (From - To)
- Mark emails as read/unread for better organization
- Delete unwanted emails to keep inbox clean
- Sent emails tracking to review your communication history
- Email notifications for new incoming messages
- Attachment support for documents and files
- Rich text editor for formatted email composition
Inbox - Received Emails List
Your main inbox displaying all received emails in chronological order. See sender information, email subject, preview of message content, timestamp, and read/unread status. Use the search bar to quickly find specific emails or filter by date range. Click on any email to read the full message and reply if needed. (Click image to zoom)
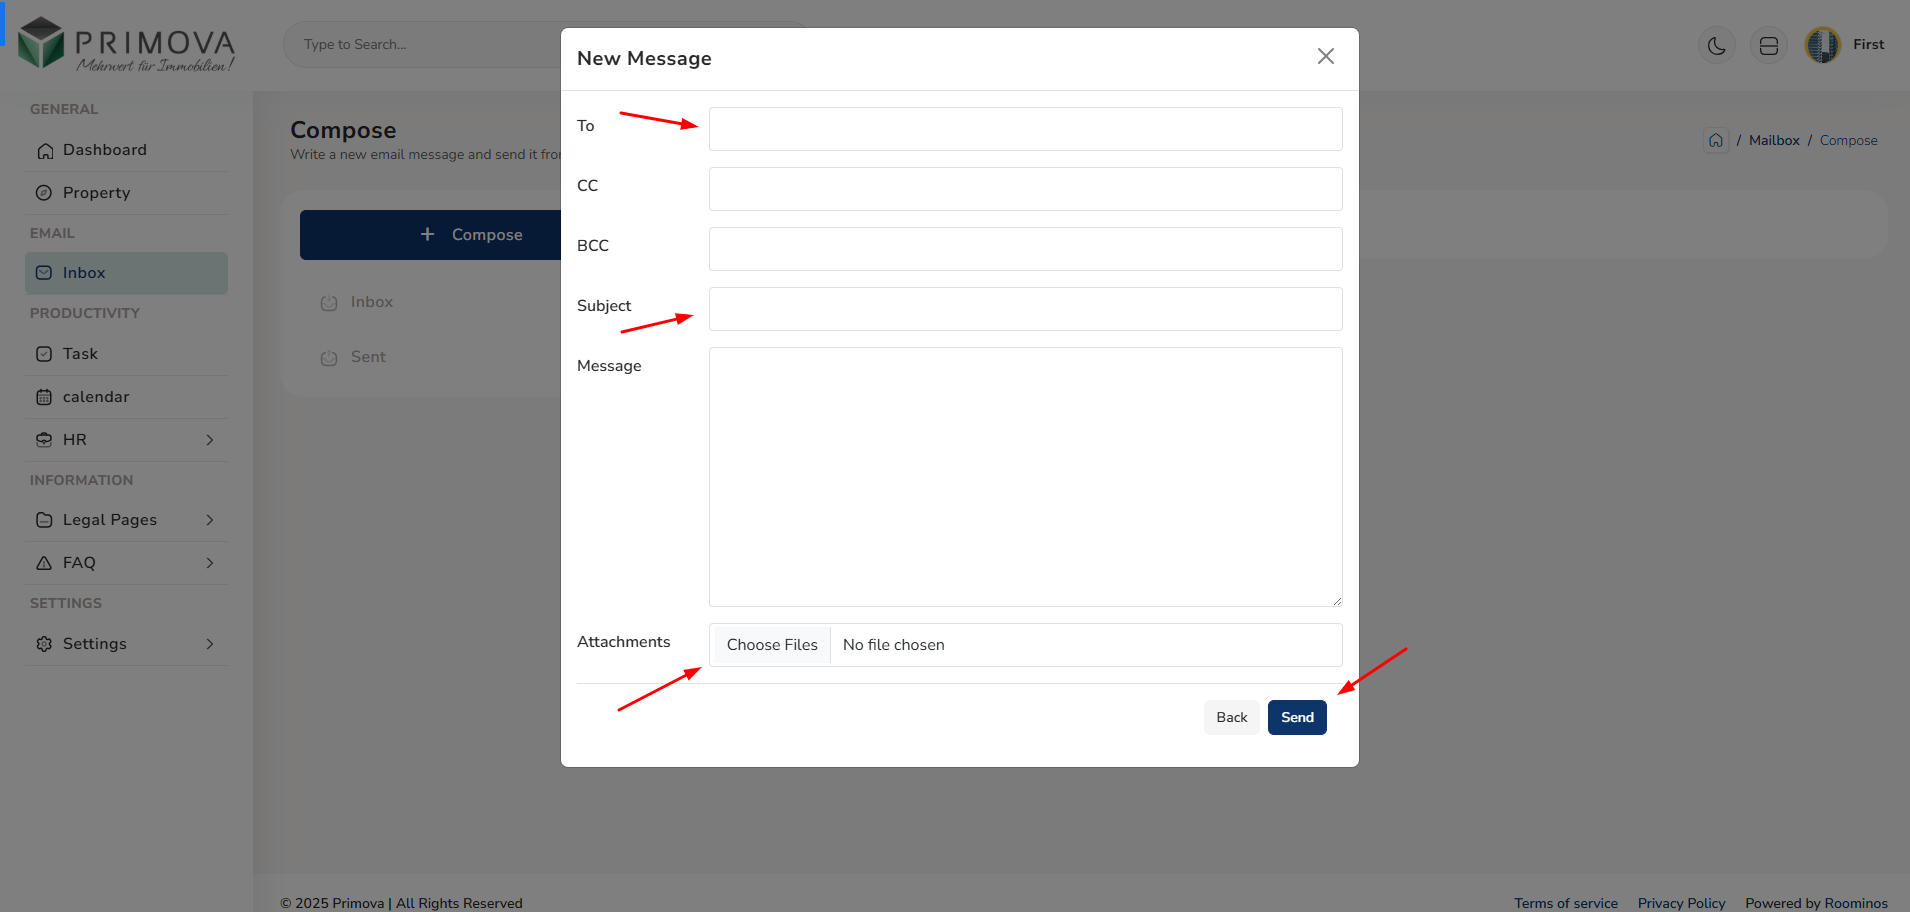
Compose Email - Send New Messages
Create and send new emails to admin or team members. Select recipient from the dropdown list, enter subject line, compose your message using the rich text editor with formatting options, and attach files if needed. Perfect for reporting updates, asking questions, or sharing information with your team. (Click image to zoom)
Read Email - View Full Message
Open and read complete email messages with full sender details, subject, timestamp, and formatted message content. View any attachments, download files, and use the reply button to respond directly. The clean interface makes reading and managing your emails efficient and organized. (Click image to zoom)
Reply to Email - Quick Response
Respond to received emails quickly with the built-in reply function. The original message is included for context, recipient is automatically filled, and you can write your response using the text editor. Send your reply with one click to maintain smooth communication flow. (Click image to zoom)
Sent Emails - Communication History
Review all emails you've sent from your account. Track your communication history, verify message delivery, and reference previous conversations. Search through sent emails by recipient, subject, or date to find specific communications quickly. (Click image to zoom)
Email System Features:
- Inbox Management: Read, reply, mark as read, delete
- Compose: Send emails to admin and colleagues
- Rich Editor: Format text with bold, italic, lists, etc.
- Attachments: Send and receive file attachments
- Search: Find emails by content, sender, or subject
- Filters: Date range filtering for organization
- Notifications: Get alerts for new messages
- Sent Box: Track all your sent communications
- Reply: Quick reply to received messages
- Status: See read/unread status at a glance
- Timestamps: Track when emails were sent/received
- Organization: Clean interface for easy navigation
💡 How to Use the Mail System:
- Check Inbox Regularly: Start your day by reviewing new emails from admin and team
- Read Important Messages: Click on any email to read full content and details
- Reply Promptly: Use the reply button to respond to emails requiring action
- Compose New Emails: Click Compose to send updates, reports, or questions
- Select Recipients: Choose admin or specific team members from dropdown
- Write Subject: Use clear, descriptive subject lines for your emails
- Format Message: Use text formatting for better readability
- Attach Files: Add documents, images, or reports when needed
- Review Before Sending: Check recipient, subject, and content
- Track Sent Emails: Use Sent box to verify message delivery
- Organize Inbox: Mark emails as read or delete old messages
- Search Efficiently: Use search when looking for specific emails
Common Email Use Cases:
- Task Updates: Report progress on assigned tasks to admin
- Property Enquiries: Share client interest and property feedback
- Schedule Coordination: Inform about appointments and meetings
- Questions: Ask admin for clarifications or guidance
- Reports: Submit daily/weekly activity reports
- Leave Requests: Follow up on vacation request status
- Team Communication: Coordinate with colleagues on projects
- Client Information: Share lead details and client requirements
- Issue Reporting: Report system issues or problems
- Acknowledgments: Confirm receipt of instructions or information
✅ Email Best Practices:
- Clear Subject Lines: Always use descriptive subjects (e.g., "Property Update: Villa 123", "Task Status: Client Meeting")
- Professional Tone: Maintain professional language in all communications
- Concise Messages: Keep emails brief and to the point
- Proper Formatting: Use paragraphs, bullets, and formatting for readability
- Quick Responses: Reply to urgent emails within same business day
- Check Recipient: Verify you're sending to the correct person
- Proofread: Review spelling and grammar before sending
- Include Details: Provide relevant context and information
- Organize Inbox: Keep your inbox clean by archiving or deleting old emails
- Mark Read: Mark emails as read after you've taken necessary action
- File Attachments: Only attach necessary files, keep sizes reasonable
- Follow Up: If no response after 2-3 days, send a polite follow-up
⚠️ Email Guidelines:
- Internal Only: This system is for internal company communication only
- No Spam: Don't send unnecessary or repetitive emails
- Confidentiality: Never share sensitive client or company information via email
- Attachments: Check file types and sizes before attaching
- Reply All: Use carefully - only when all recipients need to see your response
- Urgent Matters: For very urgent issues, consider calling instead of emailing
- Email Etiquette: Avoid all caps, excessive punctuation, or unprofessional language
- Storage: Delete old emails regularly to keep your inbox manageable
Email Notifications:
Stay updated with automatic notifications:
- New Email Alert: Get notified when you receive a new message
- Unread Count: See number of unread emails in your inbox
- Task Assignments: Receive emails when admin assigns new tasks
- System Updates: Get notified about important system announcements
- Reply Notifications: Know when someone replies to your emails
- Admin Messages: Priority alerts for messages from admin
Productivity
Tasks - Get Tasks from Admin
Comprehensive task management system where you receive work assignments from admin, view task details, update progress status, and add notes throughout the task lifecycle. Stay organized with all your assigned tasks in one place, track deadlines, update completion status, and communicate progress effectively. Perfect for managing daily work assignments and maintaining accountability.
Key Features:
- View all tasks assigned to you by admin with complete details
- See task title, description, priority level, and assigned date
- Check task deadlines and due dates to prioritize work
- Update task status (Pending, In Progress, Completed, On Hold)
- Add progress notes and updates for each task
- Communicate challenges or blockers through task notes
- Search tasks by title, description, or keywords
- Filter tasks by status (All, Pending, In Progress, Completed)
- Filter by priority level (High, Medium, Low)
- Sort by date, priority, or status
- View task history and all status changes
- Mark tasks complete with final notes
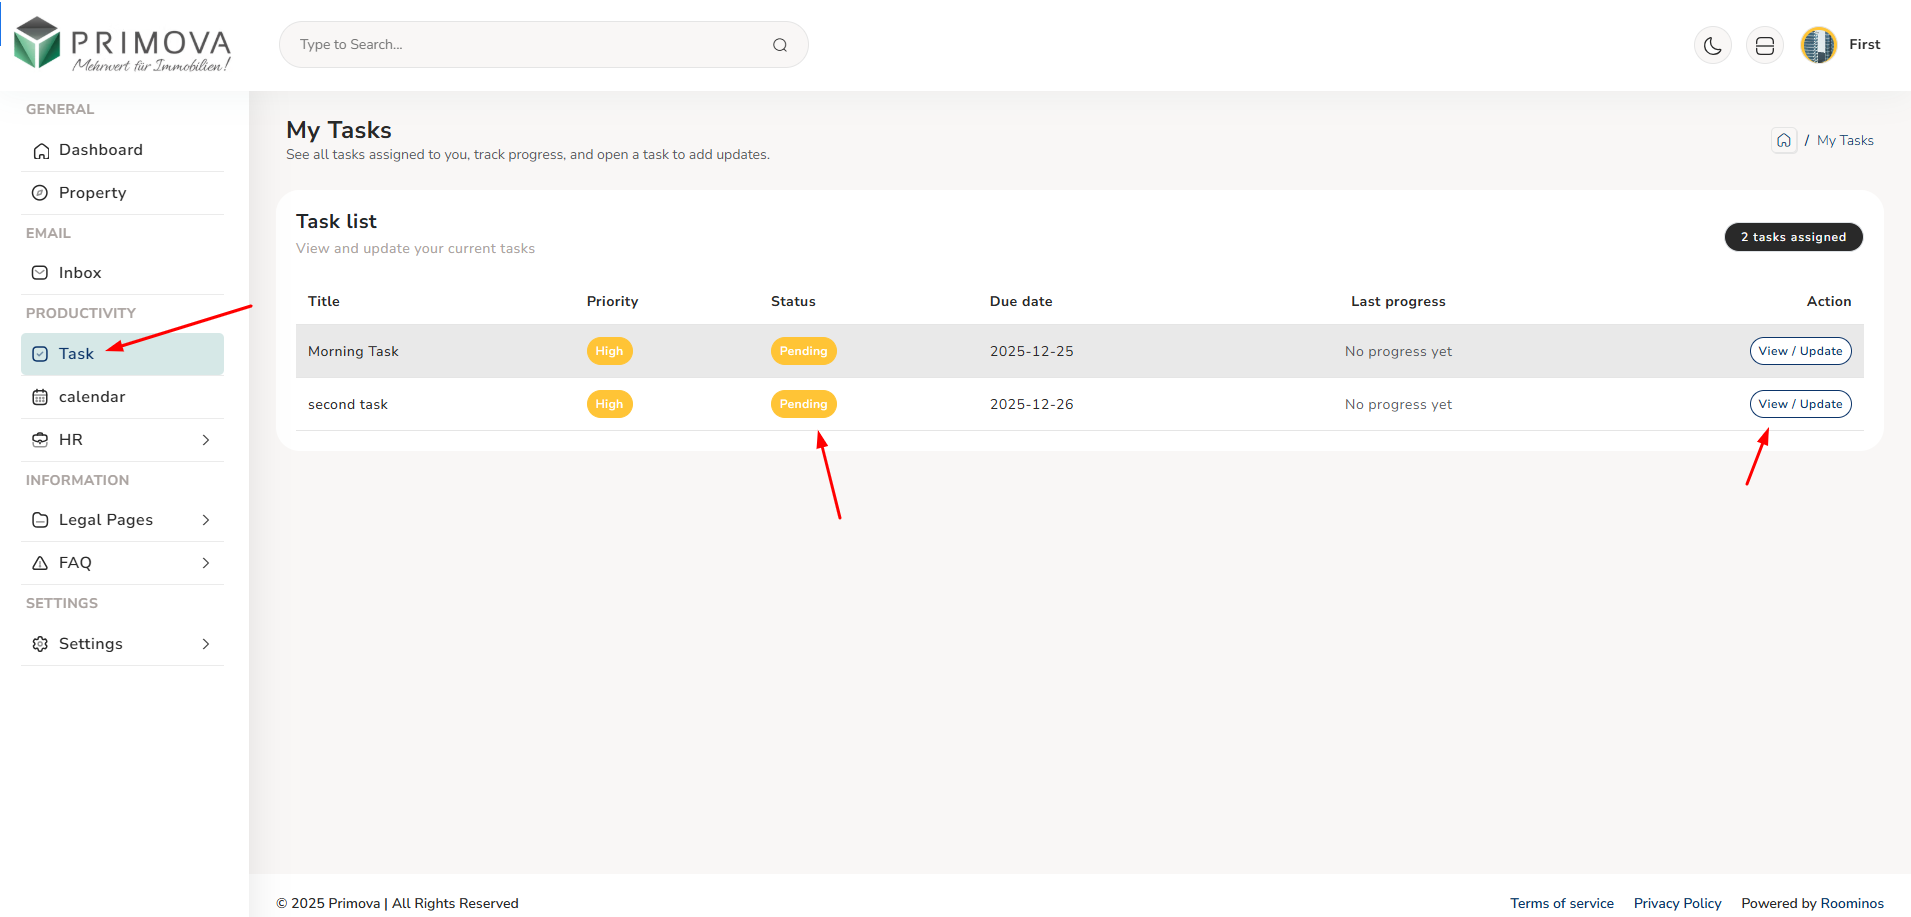
Task List - All Assigned Tasks
View all tasks assigned to you by admin in an organized list. Each task shows title, description preview, priority badge, assigned date, due date, current status, and action buttons. Use filters to view tasks by status or priority. Click on any task to see full details and update progress. (Click image to zoom)
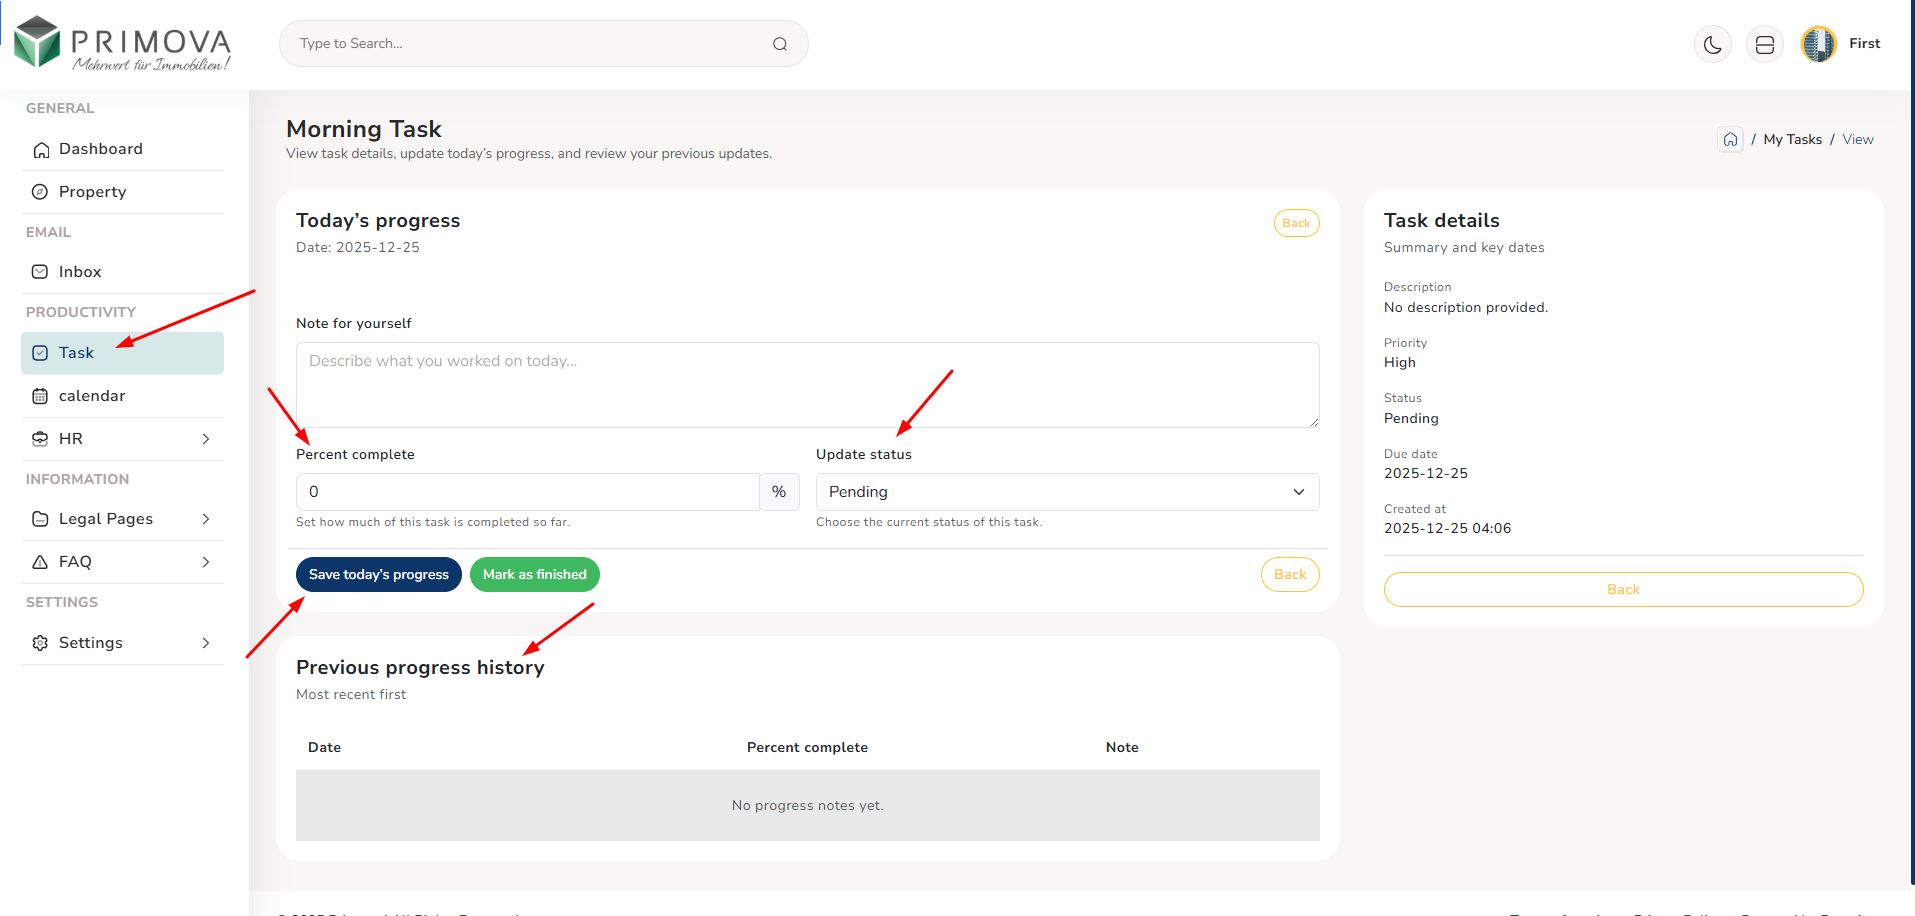
Update Task Status - Progress Tracking
Update task status to keep admin informed about your progress. Select new status from dropdown (Pending, In Progress, Completed, On Hold), add detailed notes about your progress, challenges, or completion details. Your updates are timestamped and visible to admin for tracking. (Click image to zoom)
Task Information Includes:
- Task Title: Clear task name/heading
- Description: Detailed task requirements
- Priority: High, Medium, or Low
- Assigned By: Admin who assigned the task
- Assigned Date: When task was created
- Due Date: Task deadline
- Current Status: Pending/In Progress/Completed
- Progress Notes: Your updates and comments
- Status History: All status changes
- Update Timestamps: When changes were made
- Action Buttons: View, Update, Complete
- Filters: By status, priority, or date
💡 How to Work With Tasks:
- Check Tasks Daily: Start your day by reviewing new tasks assigned by admin
- Read Carefully: Click on task to read full description and requirements
- Understand Priority: Note high-priority tasks that need immediate attention
- Check Deadline: Review due dates to plan your work schedule
- Update Status: Change status to "In Progress" when you start working
- Add Initial Note: Write note confirming you've started the task
- Track Progress: Add updates as you work through the task
- Report Issues: If you face blockers, add note explaining the challenge
- Regular Updates: For long tasks, add progress notes every 1-2 days
- Complete Task: Change status to "Completed" when finished
- Final Note: Add completion note with summary of work done
- Follow Up: If admin asks questions, respond via task notes or email
Task Status Guide:
- Pending: Task assigned but not yet started - review requirements first
- In Progress: Actively working on the task - add updates regularly
- On Hold: Task paused due to blocker or waiting for information - explain why
- Completed: Task finished successfully - add final summary note
- Status Updates: Always add notes when changing status to explain the change
- Transparency: Be honest about progress - better to report delays early
✅ Task Management Best Practices:
- Prioritize: Work on high-priority tasks first, then medium and low
- Time Management: Check due dates and allocate time accordingly
- Clear Notes: Write detailed, specific notes - not just "working on it"
- Regular Updates: Don't wait until completion - update progress regularly
- Ask Questions: If unclear about requirements, ask admin via email or task notes
- Report Early: If you'll miss deadline, inform admin as soon as possible
- Be Specific: In notes, mention what you did, challenges faced, next steps
- Complete Properly: Don't mark as complete until fully finished
- Document Issues: If task has problems, document them clearly in notes
- Stay Organized: Use filters to focus on pending or high-priority tasks
- Daily Review: Check task list every morning for new assignments
- Professional: Keep notes professional and focused on work progress
⚠️ Important Task Guidelines:
- Don't Ignore: Never ignore assigned tasks - acknowledge them promptly
- Don't Wait: Start working on tasks well before deadline
- Don't Assume: If unsure about anything, ask for clarification
- Status Accuracy: Keep status updated - outdated status causes confusion
- Note Quality: Vague notes like "done" or "ok" are not helpful
- Deadline Respect: Treat deadlines seriously - they're there for a reason
- Communication: If you can't complete on time, communicate early
- Complete Tasks: Finish tasks fully before marking complete
Good vs Bad Task Notes Examples:
✅ Good Notes:
- "Started contacting property owners. Called 5 owners, 3 answered, scheduled 2 viewings."
- "Completed property report. Added 8 new listings with all details and photos."
- "Task on hold - waiting for client's final budget confirmation. Expected tomorrow."
❌ Bad Notes:
- "Working on it" (too vague)
- "Done" (no details)
- "Will do later" (not helpful)
- "Ok" (no information)
Calendar - Scheduling & Date Alerts
Integrated calendar system for managing your schedule, booking appointments, setting important date reminders, and organizing your daily activities. Keep track of property viewings, client meetings, deadlines, and personal reminders all in one place. Perfect for staying organized and never missing important appointments or dates.
Key Features:
- Full calendar view with monthly, weekly, and daily layouts
- Create new appointments with title, description, and time
- Schedule property viewing appointments with clients
- Set date alerts and reminders for important events
- Book client meetings and follow-up appointments
- Add task deadlines to calendar for visual tracking
- Set recurring appointments (daily, weekly, monthly)
- Color-coded events by type (appointments, reminders, deadlines)
- View upcoming appointments in list format
- Get notifications before appointments start
- Edit or reschedule appointments as needed
- Delete cancelled appointments
- Search calendar events by title or description
- Export calendar to sync with external calendars
Calendar View - Monthly Overview
Full month calendar showing all your appointments, meetings, and reminders at a glance. Color-coded events make it easy to distinguish between different types of appointments. Click on any date to view details or add new events. Navigate between months using arrows. (Click image to zoom)
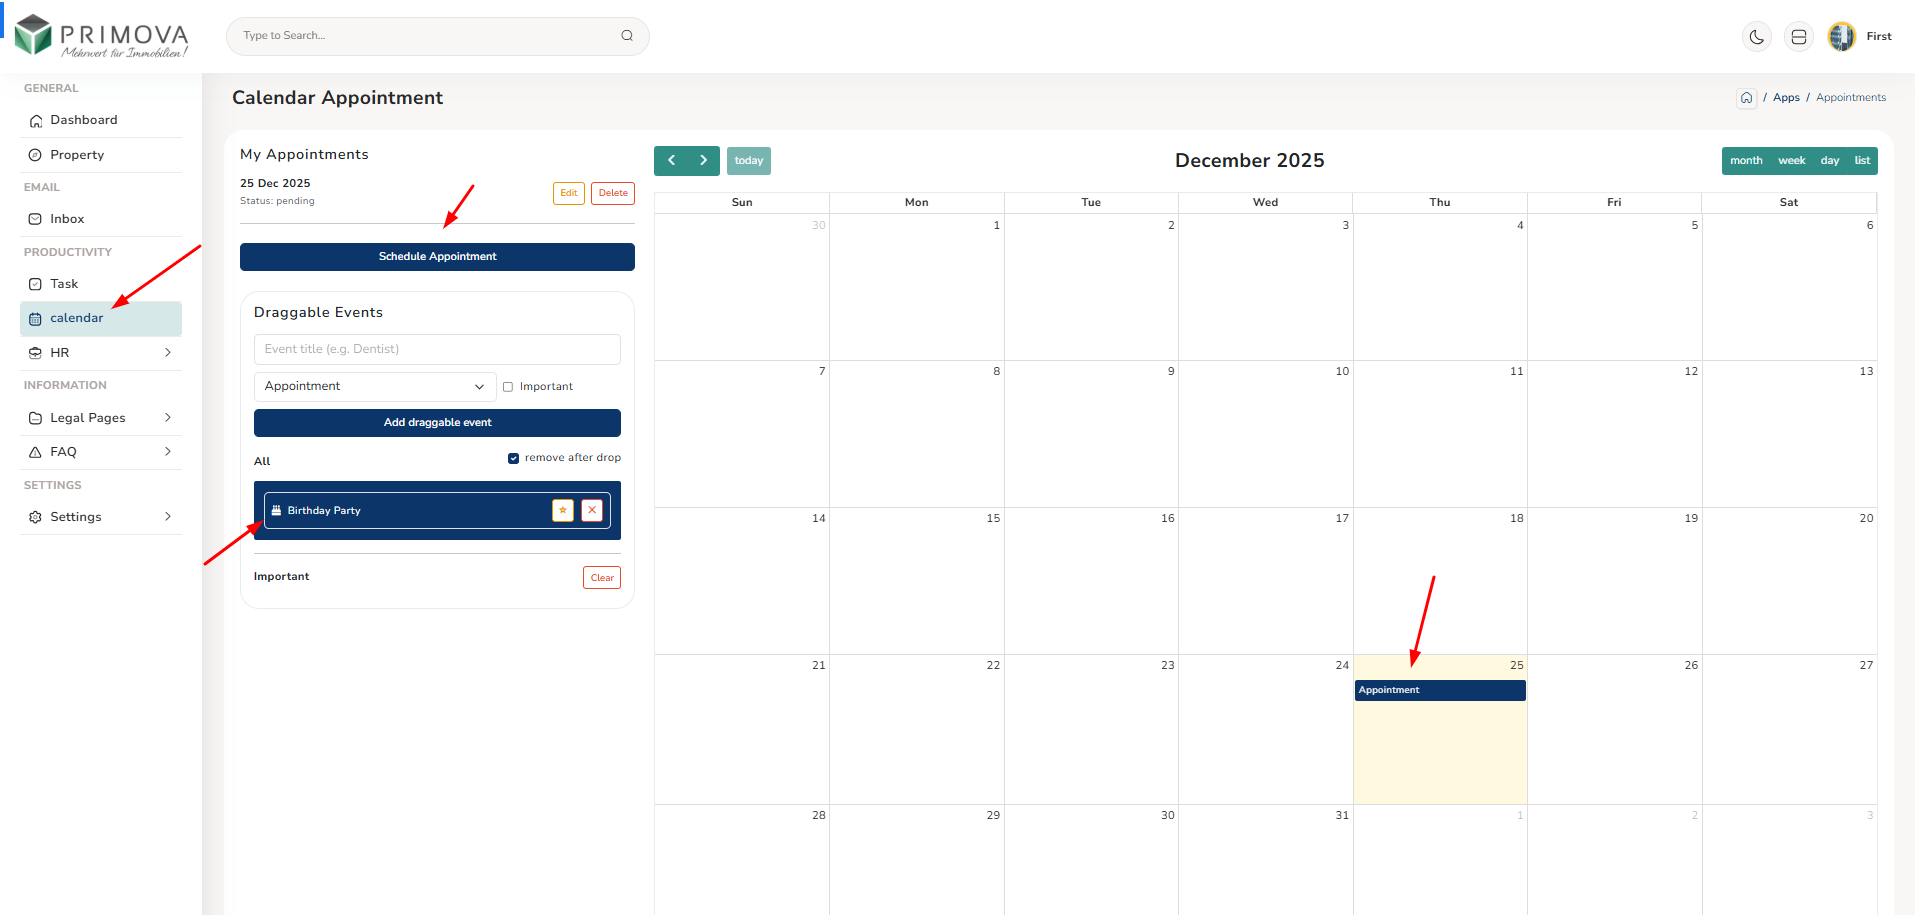
Create Appointment - Schedule New Event
Add new appointments to your calendar with complete details. Enter event title, description, select date and time, choose event type (appointment, reminder, meeting), set duration, and add notes. Option to set notification alerts before the appointment starts.
Upcoming Appointments - List View
View all your upcoming appointments in chronological list format. See event title, date, time, type, and quick action buttons to edit, delete, or view details. Perfect for checking what's coming up today or this week without navigating the full calendar.
Edit Appointment - Reschedule or Update
Modify existing appointments when schedules change. Update date, time, description, or any other details. Perfect for rescheduling client meetings or updating appointment information. All changes are saved and reflected in your calendar immediately.
Appointment Alerts - Notification System
Get automatic notifications and reminders before your appointments. Set custom alert times (15 minutes, 1 hour, 1 day before). Never miss important meetings or property viewings. Alerts appear as system notifications and in-app reminders.
Calendar Event Types:
- Property Viewings: Client property tour appointments
- Client Meetings: Initial consultations, negotiations
- Follow-ups: Client callback appointments
- Deadlines: Task completion dates
- Reminders: Important date alerts
- Team Meetings: Internal staff meetings
- Owner Calls: Scheduled property owner discussions
- Personal: Your personal reminders
- Training: Company training sessions
- Events: Company events or conferences
💡 How to Use Calendar Effectively:
- Start Your Day: Check calendar every morning for today's appointments
- Book Immediately: Add appointments as soon as they're scheduled
- Clear Titles: Use descriptive titles (e.g., "Property Viewing - Villa 123 with Mr. Smith")
- Add Details: Include client name, property address, phone number in description
- Set Reminders: Always set alert for important appointments
- Buffer Time: Leave gaps between appointments for travel time
- Sync Regularly: Check calendar throughout the day
- Update Promptly: If appointment changes, update calendar immediately
- Color Coding: Use different types to visually organize your schedule
- Weekly Review: Every Sunday, review next week's schedule
- Prepare Ahead: Check tomorrow's appointments before end of day
- Delete Old: Remove cancelled or completed old appointments
Calendar Best Practices:
- Be Specific: Include all relevant details in appointment description
- Realistic Timing: Don't overbook - allow sufficient time for each appointment
- Travel Time: Factor in travel between locations when scheduling
- Confirm Appointments: Call clients to confirm day before the appointment
- Set Multiple Reminders: For critical meetings, set 1 day and 1 hour reminders
- Block Personal Time: Schedule breaks and lunch in calendar too
- Weekend Planning: Add personal reminders for important weekend dates
- Recurring Events: Use recurring feature for weekly team meetings
- Availability: Keep calendar current so admin knows when you're free
- Professional: Treat calendar as your official schedule
✅ Appointment Management Tips:
- Early Morning: Check calendar first thing - know your daily schedule
- Immediate Entry: Add appointments right after booking them
- Complete Information: Always include contact numbers in case you need to reschedule
- Client Names: Use full client names for easy identification
- Property Details: For viewings, include property address and type
- Alert Settings: Set 1-hour alerts for local meetings, 1-day for distant locations
- Update Status: Mark appointments as completed after they're done
- Reschedule Properly: If client cancels, update or delete the appointment
- Backup Reminders: For very important meetings, add to personal phone calendar too
- Weekly Planning: Review upcoming week every Friday
⚠️ Calendar Guidelines:
- Never Skip: Don't skip adding appointments thinking you'll remember
- Update Changes: Always update calendar if appointment time changes
- Be Punctual: Arrive 5-10 minutes early for appointments
- Don't Overbook: Leave realistic gaps between appointments
- Confirm First: For property viewings, confirm owner availability first
- Professional Conduct: Never cancel appointments last minute without good reason
- Client Communication: Inform clients immediately if you must reschedule
- Respect Time: Other people plan around your scheduled appointments
Notification & Alert Settings:
- 15-Minute Alert: Best for office-based or nearby appointments
- 1-Hour Alert: Good for local client meetings requiring preparation
- 1-Day Alert: Ideal for important meetings or distant locations
- Multiple Alerts: Set both 1-day and 1-hour for critical appointments
- Custom Times: Adjust alert timing based on your needs
- System Notifications: Enable browser/system notifications for alerts
- Email Reminders: Option to receive email reminders for appointments
HR
My Attendance - Clock In/Out & View Records
Complete attendance management system where you can clock in when you start work, clock out when you finish, and view your complete attendance history. Track your daily work hours, see recent attendance records, monitor total hours worked, and maintain accurate time logs. Available both in header dropdown menu and HR section for quick access. Real-time tracking with automatic time calculation ensures accurate record of your working hours.
Key Features:
- Clock In button to mark arrival and start of workday
- Clock Out button to mark departure and end of workday
- Today section shows current day attendance status
- Display current date and real-time clock
- Shows exact clock in time (HH:MM:SS format)
- Shows exact clock out time when you leave
- Automatically calculates total hours worked for the day
- Recent Days section displays last 3 days attendance history
- Table view with Date, Clock In, Clock Out, Total Hours columns
- Color-coded status - complete days vs incomplete records
- Warning message if not clocked in yet today
- Quick access from user profile dropdown in header
- Mobile responsive design for on-the-go clock in/out
- Prevents duplicate clock in/out on same day
- Timestamp accuracy to the second for precise records
📸 Clock In - Start Your Work Day:
When you arrive at work and start your day, click the blue "Clock In" button. This records your arrival time with exact timestamp. You'll see a confirmation message "You have not clocked in yet today" before clocking in. After successful clock in, your arrival time appears in the "Today" section. (Click image to zoom)

Clock In Details
The clock in screen shows the current date and time at the top. You'll see a message indicating you haven't clocked in yet. Simply click the blue "Clock In" button to register your arrival. The system records the exact time down to the second. Your clock in time will then appear in the "Today" section under "Clock in time". The "Recent days" table shows your attendance history for the last 2-3 days.
📸 Clock Out - End Your Work Day:
When you finish work and are ready to leave, click the red "Clock Out" button. This records your departure time and automatically calculates your total working hours for the day. The system computes the duration between your clock in and clock out times to show total hours worked. (Click image to zoom)
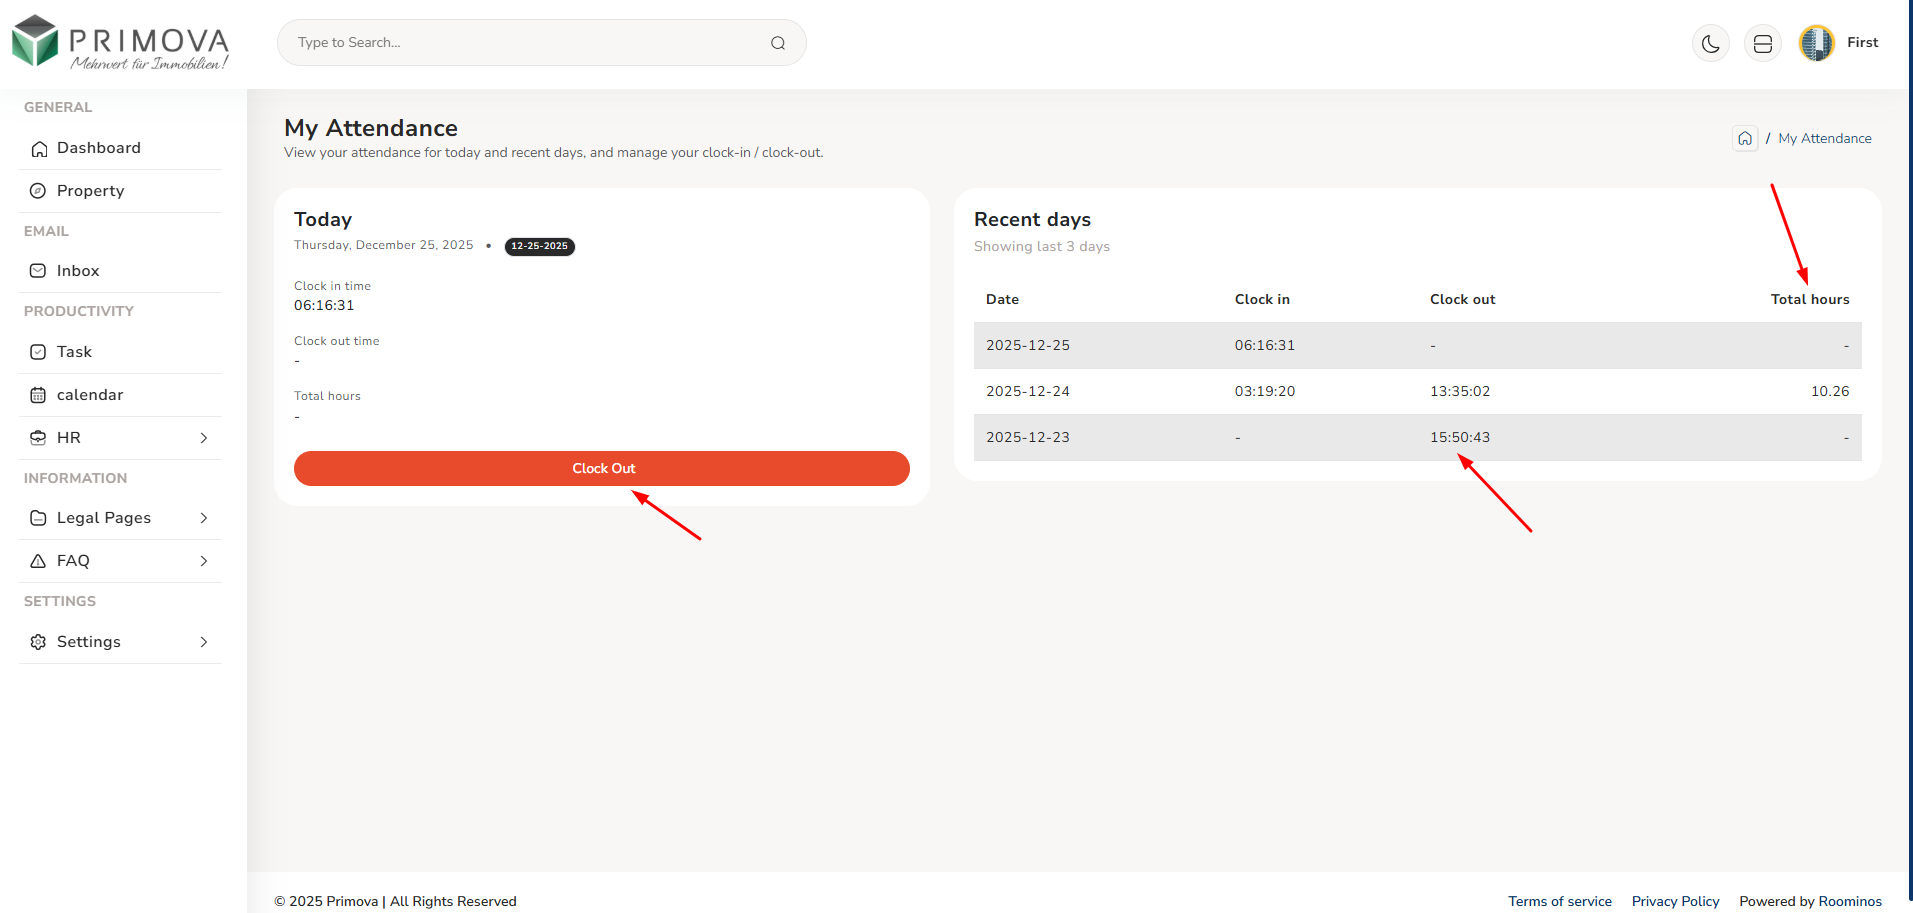
Clock Out Details
After clocking in, you'll see your clock in time displayed (e.g., 06:16:31). The clock out time shows as "-" until you clock out. Total hours remains "-" until you complete the day by clocking out. When ready to leave, click the prominent red "Clock Out" button. The system will record your exit time and calculate total working hours. The Recent days section shows previous attendance with complete records including total hours like "10.26" for full days.
Attendance Information Includes:
- Current Date: Today's date displayed prominently
- Current Time: Real-time clock showing present time
- Clock In Time: Exact time you arrived (HH:MM:SS)
- Clock Out Time: Exact time you departed (HH:MM:SS)
- Total Hours: Calculated work duration for the day
- Status Badge: Date badge showing current date
- Recent Days: Last 3 days attendance history
- Date Column: Date in YYYY-MM-DD format
- Clock In Column: Arrival time or "-" if not clocked in
- Clock Out Column: Departure time or "-" if not clocked out
- Total Hours Column: Calculated hours or "-" if incomplete
- Historical Records: View past attendance patterns
💡 How to Use Attendance System:
- Morning Arrival: When you reach office/start work, open the attendance page
- Click Clock In: Press the blue "Clock In" button immediately upon arrival
- Verify Time: Check that the clock in time is recorded correctly
- Work Normally: Continue with your regular work throughout the day
- Evening Departure: Before leaving office/ending work, return to attendance page
- Click Clock Out: Press the red "Clock Out" button when you're ready to leave
- Check Total Hours: Verify your total working hours calculation
- Review History: Check Recent Days table to see your attendance pattern
- Report Issues: If you forget to clock in/out, inform HR immediately
- Quick Access: Use header dropdown menu for faster access to attendance
Understanding Attendance Records:
- Complete Day: Shows clock in time, clock out time, and total hours (e.g., 03:19:20, 13:35:02, 10.26)
- Incomplete Day: Shows only clock in but "-" for clock out and total hours if you forgot to clock out
- Not Clocked In: Shows "-" for both clock in and total hours if you forgot to clock in
- Odd Clock Out: Shows only clock out time without clock in (indicates you forgot morning clock in)
- Current Day Incomplete: Today's record will show "-" for clock out until you clock out
- Total Hours Format: Displayed as decimal hours (e.g., 10.26 = 10 hours 16 minutes)
- Time Format: All times shown in HH:MM:SS format (24-hour clock)
- Date Format: Dates displayed as YYYY-MM-DD for consistency
⚠️ Attendance Important Notes:
- Daily Responsibility: You must clock in and clock out every working day
- Accurate Times: Always clock in/out at actual arrival/departure times
- No Proxy: Never ask colleagues to clock in/out on your behalf
- Forgot Clock In: If you forget, inform HR same day with your actual arrival time
- Forgot Clock Out: Contact HR next day with your actual departure time
- Technical Issues: If system has problems, email HR immediately with timestamp
- Leave Days: Don't clock in/out on approved vacation or sick leave days
- Half Days: Clock in and out even for half-day work
- Work From Home: Check company policy - may need to clock in/out even remotely
- Accuracy Matters: Attendance records are used for payroll, performance, and compliance
- Company Policy: Late arrivals or early departures may require HR approval
- Review Weekly: Check your attendance records every week for accuracy
Common Attendance Scenarios:
- Normal Day: Clock in at start (e.g., 09:00), clock out at end (e.g., 18:00) = 9 hours
- Overtime: Clock out later than usual, system calculates extra hours worked
- Half Day: Clock in and out for shorter duration, hours reflect actual time
- Late Arrival: Clock in whenever you arrive, time is recorded accurately
- Early Leave: Clock out early, system records actual hours worked
- Forgot Morning Clock In: Clock out still works but total shows "-" - inform HR
- Forgot Evening Clock Out: Next day shows incomplete record - inform HR
- Weekend Work: Clock in/out if working on weekend/holiday
- Multiple Locations: Clock in/out from any location if remote work allowed
- Break Time: Usually no need to clock out for lunch break - check policy
✅ Attendance Best Practices:
- Be Consistent: Clock in and out at the same time daily for good record
- Immediate Action: Clock in immediately upon arrival, clock out right before leaving
- Don't Rush: Take 30 seconds to ensure clock in/out is successful
- Check Confirmation: Always verify the time is recorded after clicking button
- Header Access: Bookmark or use header dropdown for quick daily access
- Mobile Friendly: Save page on phone home screen for easy mobile access
- Set Reminders: Phone alarm reminder to clock out before leaving office
- Check History: Review recent days each Friday to catch any missed entries
- Communicate: If pattern change (new shift, remote work), inform HR in advance
- Stay Honest: Accurate attendance reflects your professionalism and integrity
Payroll - View Salary Details
Complete payroll information system where you can view your salary details, payment history, salary breakdown, deductions, bonuses, and all compensation-related information. Access your monthly payslips, check payment dates, review salary components, and track your earnings throughout the year. Full transparency in your compensation with detailed breakdown of gross salary, net salary, taxes, and other deductions.
Key Features:
- View complete salary details with monthly breakdown
- Access current month and previous months' payroll information
- See gross salary, net salary, and all deductions
- View tax deductions and social security contributions
- Check bonuses, allowances, and additional compensation
- Review overtime payments and commissions (if applicable)
- Download payslips in PDF format for your records
- View payment date and payment method
- See year-to-date (YTD) earnings and deductions
- Check bank account details for salary transfer
- View salary history for previous months and years
- Access salary certificates for loan or visa applications
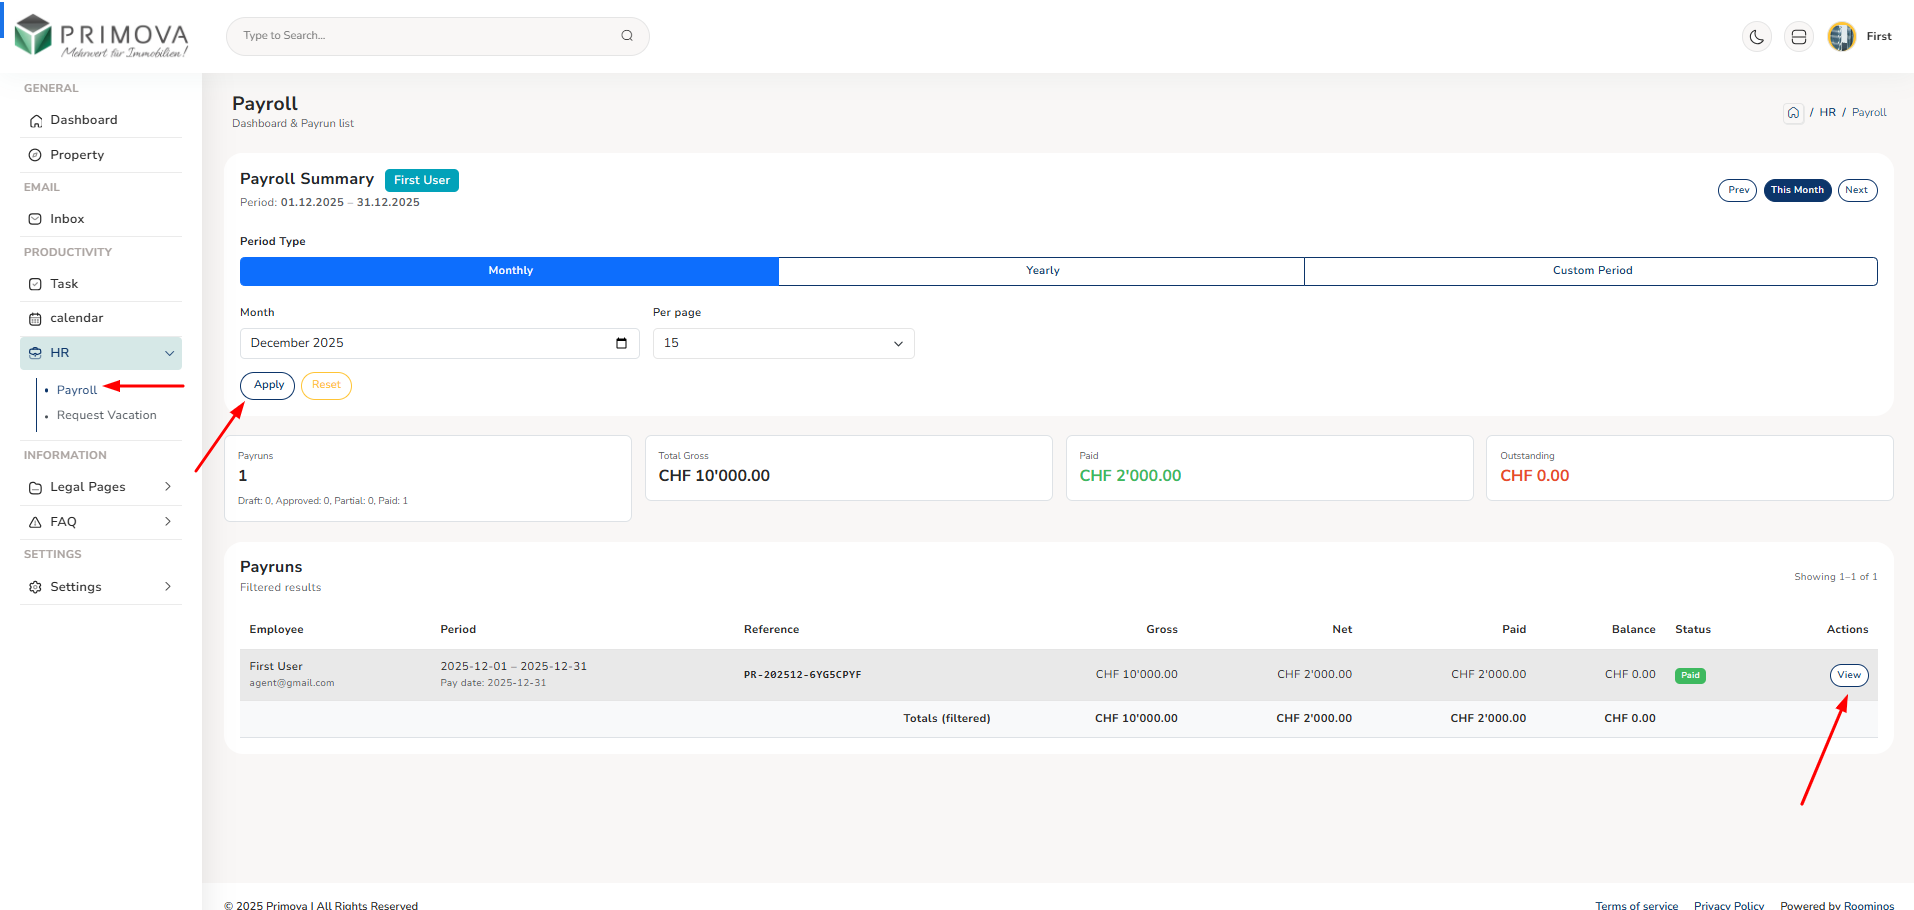
Payroll Dashboard - Salary Overview
Your payroll dashboard showing current month's salary summary, payment status, gross salary, net salary, total deductions, and quick access to payslip. View at a glance your earnings for the month and payment schedule. See breakdown of all salary components in one place. (Click image to zoom)
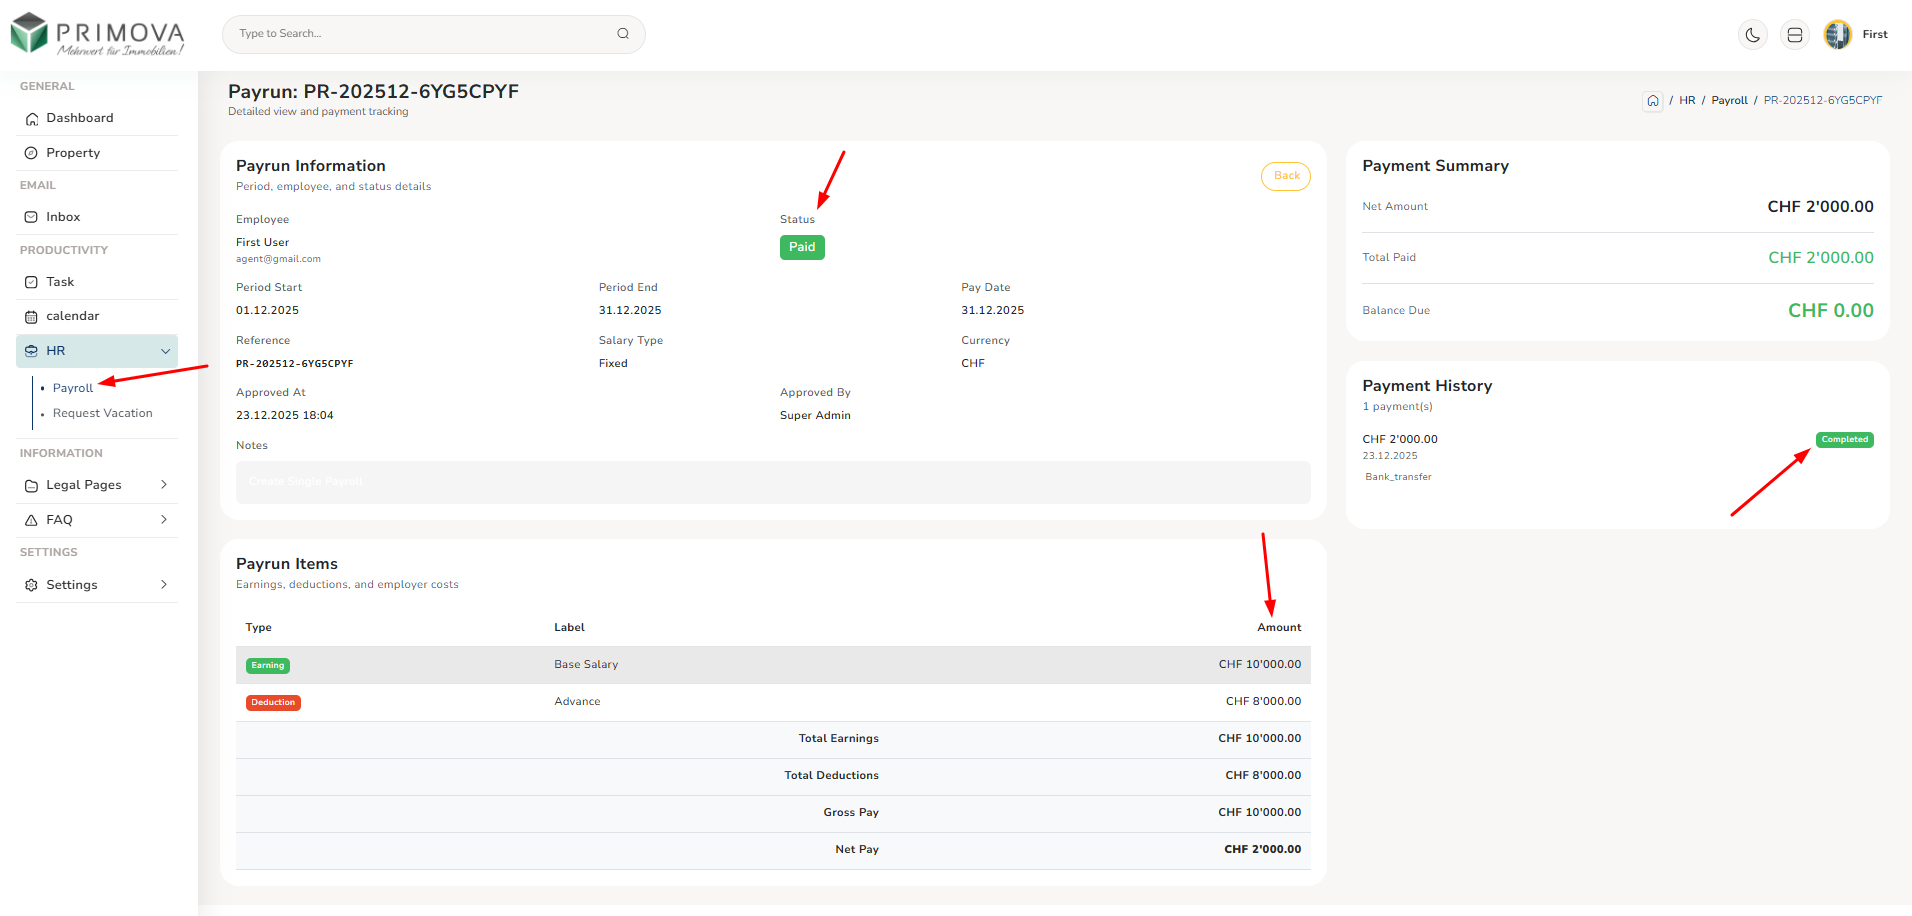
Payslip Details - Complete Breakdown
Detailed payslip showing all salary components - basic salary, allowances (housing, transport, etc.), bonuses, overtime, gross salary, deductions (tax, insurance, pension), and final net salary. Includes employee information, payment date, payment method, and employer details. Download as PDF for your records. (Click image to zoom)
Salary History - Monthly Records
View your complete salary history by month and year. See payment dates, gross amounts, net amounts, and deductions for each pay period. Filter by year to review annual earnings. Compare month-to-month changes and track your compensation over time. Access and download payslips from any previous month.
YTD Summary - Year-to-Date Earnings
Comprehensive year-to-date summary showing total gross earnings, total net earnings, total tax paid, total deductions, and other cumulative figures from January to current month. Perfect for understanding your annual compensation and tax obligations. Useful for personal financial planning and tax filing.
Payroll Information Includes:
- Basic Salary: Your base monthly salary
- Allowances: Housing, transport, meal allowances
- Bonuses: Performance bonus, annual bonus
- Overtime: Extra hours compensation
- Commissions: Sales commissions if applicable
- Gross Salary: Total before deductions
- Tax Deductions: Income tax withholding
- Insurance: Health/life insurance premiums
- Pension: Retirement fund contributions
- Other Deductions: Loans, advances repayment
- Net Salary: Final amount you receive
- Payment Date: When salary is transferred
💡 How to Use Payroll System:
- Check Monthly: Review your payslip every month after salary is processed
- Verify Details: Check all amounts are correct - basic salary, allowances, bonuses
- Review Deductions: Ensure tax and insurance deductions are accurate
- Download Payslip: Save PDF copy for your personal records
- Compare Previous: Check against previous months to spot any changes
- Question Errors: If you see any mistakes, contact HR immediately via email
- Track Bonuses: Monitor when bonuses are added to your salary
- YTD Review: Check year-to-date totals for annual planning
- Tax Planning: Use YTD tax deductions for tax return preparation
- Keep Records: Maintain payslips for at least 3 years
- Salary Certificate: Request from HR if needed for loans or visa
- Bank Details: Verify your bank account information is correct
Understanding Your Payslip:
- Pay Period: The month/dates the salary covers
- Employee ID: Your unique employee identification number
- Designation: Your job title/role in the company
- Join Date: Your employment start date
- Earnings: All payments made to you (salary, allowances, bonuses)
- Deductions: All amounts subtracted (tax, insurance, loans)
- Net Pay: Final amount deposited to your bank account
- Payment Method: Usually bank transfer with account details
- Payment Date: When the salary was/will be transferred
⚠️ Payroll Important Notes:
- Confidential: Your salary information is private - don't share with colleagues
- Check Regularly: Always review payslip each month for accuracy
- Report Errors: Contact HR immediately if you find any discrepancies
- Payment Delays: If salary not received on time, inform HR right away
- Tax Compliance: Ensure tax deductions are correct for your own protection
- Bank Updates: Notify HR if you change bank account details
- Document Storage: Keep payslips safe - you may need them for loans, visa, etc.
- Read-Only: You can view but not edit payroll information
- Questions: For salary queries, contact HR department, not admin
Common Payroll Scenarios:
- Bonus Month: Check for additional bonus amount in earnings section
- Salary Increase: Verify new basic salary after promotion/raise
- Overtime: Look for overtime hours and payment in earnings
- Unpaid Leave: Deductions may show salary reduction for unpaid days
- Loan Repayment: Check deductions section for loan EMI
- Commission: Sales staff can see commission in variable earnings
- Tax Adjustment: End of year may have tax adjustments
- Pro-rata: First/last month may show partial salary for partial month worked
Vacation Request - Submit Leave Applications
Complete vacation and leave request system where you can submit requests for time off, view your leave balance, check request status, and manage all your vacation applications. Request paid leave, sick leave, personal days, or other types of time off. Track your annual leave entitlement, used days, and remaining days. Admin reviews and approves/rejects your requests with notifications sent to keep you updated.
Key Features:
- Submit new vacation/leave requests online anytime
- Select leave type (Annual Leave, Sick Leave, Personal, Unpaid)
- Choose start date and end date for your leave period
- Calculate total days automatically (working days only)
- Add reason/notes to explain your leave request
- View your total annual leave entitlement
- Check how many leave days you've used this year
- See remaining leave days available
- Track request status (Pending, Approved, Rejected)
- View all previous leave requests and history
- Get email notifications when admin responds to request
- See admin's approval/rejection notes and feedback
- Edit pending requests before admin reviews them
- Cancel submitted requests if plans change
Leave Balance - Your Vacation Overview
Dashboard showing your complete leave balance - total annual leave entitlement, days used so far this year, days pending approval, and remaining days available. Color-coded display makes it easy to see your vacation status at a glance. Plan your time off based on available balance. (Click image to zoom)
Submit Leave Request - New Application
Form to submit new vacation request. Select leave type from dropdown, pick start and end dates using calendar picker, system automatically calculates working days, add reason for leave, and submit for admin review. Simple and quick process to request time off work.
Leave History - All Requests
Complete list of all your leave requests - past, present, and pending. See leave type, start date, end date, number of days, status (Pending/Approved/Rejected), submission date, and admin's response. Filter by status or date range to find specific requests. Track your entire vacation history.
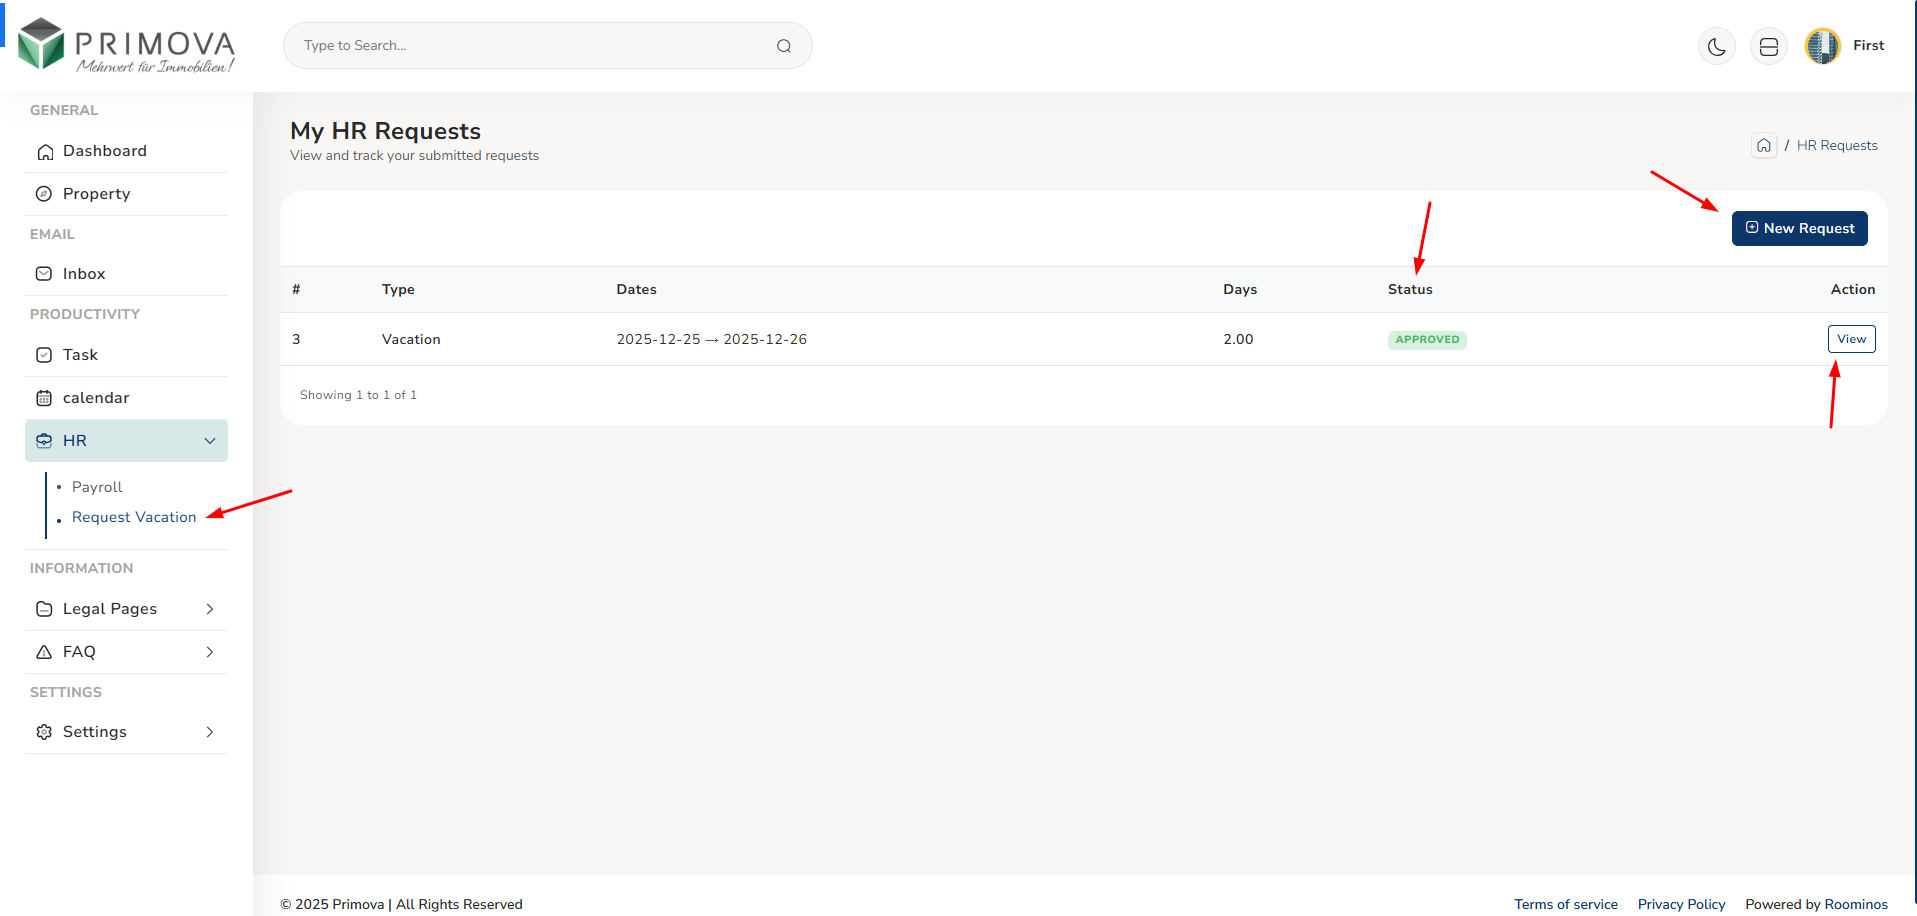
Approved Request - Confirmation Details
View details of approved leave request showing leave dates, approved status with green badge, admin approval notes, and confirmation. Print or save confirmation for your records. Know that your vacation is officially approved and you can make travel plans confidently.
Pending Request - Waiting for Approval
View pending leave requests that are awaiting admin review and approval. Status shows "Pending" with yellow badge. You can edit request details or cancel the request if your plans change. Once admin reviews, you'll receive notification with decision.
Leave Types Available:
- Annual Leave: Paid vacation days (main entitlement)
- Sick Leave: For illness (may require medical certificate)
- Personal Leave: Personal matters or emergencies
- Unpaid Leave: Time off without salary
- Maternity Leave: For expecting mothers
- Paternity Leave: For new fathers
- Compassionate Leave: Family emergencies
- Study Leave: For education/training
💡 How to Request Leave:
- Check Balance: First verify you have sufficient leave days available
- Plan Ahead: Submit requests well in advance (at least 2 weeks for annual leave)
- Click Submit: Go to Vacation Request section and click "New Request"
- Select Type: Choose appropriate leave type (Annual, Sick, Personal, etc.)
- Pick Dates: Select start date and end date using calendar picker
- Verify Days: Check automatically calculated working days count
- Add Reason: Write clear reason for your leave request
- Review: Double-check all details before submitting
- Submit: Click submit button to send request to admin
- Wait for Response: Admin will review and respond (usually within 2-3 days)
- Check Status: Monitor request status in leave history
- Get Notification: You'll receive email when admin approves/rejects
Leave Request Best Practices:
- Advance Notice: Submit annual leave requests at least 2 weeks before start date
- Busy Periods: Avoid requesting leave during peak business periods
- Clear Reasons: Always provide specific reason for leave request
- Professional: Keep reason professional and brief
- Medical Certificates: For sick leave over 3 days, be ready to provide doctor's note
- Team Coordination: Inform your team before submitting extended leave
- Work Handover: Arrange coverage for your responsibilities during absence
- Emergency Leave: For urgent matters, call admin and submit request ASAP
- Split Requests: Long vacations can be split into multiple requests if needed
- Check Calendar: Verify no important meetings/deadlines during your leave
✅ Leave Management Tips:
- Track Your Balance: Monitor remaining days throughout the year
- Plan Annual Leave: Plan vacation early in the year to secure preferred dates
- Use Your Days: Don't let annual leave expire - use your entitlement
- Coordinate: Check if colleagues are on leave same dates to ensure coverage
- Flexibility: Be flexible with dates if admin suggests alternatives
- Proper Handover: Brief colleagues on pending work before leave
- Out of Office: Set email auto-reply during vacation
- Emergency Contact: Leave emergency contact number with admin
- Return Plans: Inform when you'll be back if leave extends
- Respect Decisions: If rejected, ask admin for suitable alternative dates
⚠️ Leave Policy Guidelines:
- Advance Notice: Annual leave requires minimum 2 weeks advance notice (company policy)
- Maximum Days: Check company policy for maximum consecutive leave days allowed
- Approval Time: Admin typically responds within 2-3 business days
- Peak Periods: Leave may be restricted during busy seasons
- Team Balance: Admin ensures team coverage before approving
- Sick Leave: Medical certificate required for sick leave over 3 days
- Unpaid Leave: Only approved in special circumstances
- Leave Carryover: Check if unused leave carries to next year
- Public Holidays: Don't count as leave days if they fall in your vacation
- Rejection Reasons: Admin will explain if leave request is rejected
- No Show: Taking unauthorized leave is serious misconduct
- Emergencies: For true emergencies, call admin immediately
Leave Request Status Updates:
- Pending: Request submitted, awaiting admin review
- Approved: Leave approved - you can proceed with vacation plans
- Rejected: Not approved - read admin notes for reason and alternative suggestions
- Email Notifications: You receive email for all status changes
- Admin Notes: Check admin comments for approval conditions or rejection reasons
- Edit Before Approval: Can edit pending requests before admin reviews
- Cannot Edit Approved: Once approved, contact admin to make changes
Understanding Leave Balance:
- Total Entitlement: Annual leave days you're entitled to per year (e.g., 21 days)
- Used Days: Leave days you've taken so far this year
- Pending Days: Days in pending requests not yet approved/rejected
- Remaining Days: Available days = Entitlement - Used - Pending
- Calculation: System updates balance automatically after approval
- Year Reset: Balance resets on January 1st (or your anniversary date)
- Pro-rata: New employees get pro-rated leave based on join date
Information
Legal Pages - View Only Access
Access to important company legal documents, policies, terms and conditions, and official documentation. All legal pages are view-only for employees to read, understand, and reference as needed. Stay informed about company policies, employment terms, code of conduct, privacy policies, and other legal requirements. Essential information for compliance and understanding your rights and responsibilities as an employee.
Key Features:
- View all company legal documents and policies
- Access employment terms and conditions
- Read employee code of conduct and ethics policy
- Review company privacy policy and data protection
- See terms of service and user agreements
- Access anti-discrimination and harassment policies
- View health and safety regulations
- Read company intellectual property policy
- Review confidentiality and non-disclosure agreements
- Access disciplinary procedures documentation
- See grievance and complaint procedures
- Download legal documents for personal reference (PDF)
- Search legal pages by keyword or topic
- View last updated date for each document
Legal Pages List - All Documents
Browse complete list of all legal documents and company policies available for viewing. See document titles, categories, last updated dates, and quick view buttons. Organized by category for easy navigation - Employment, Compliance, Policies, Safety, etc. Click any document to read full content. (Click image to zoom)
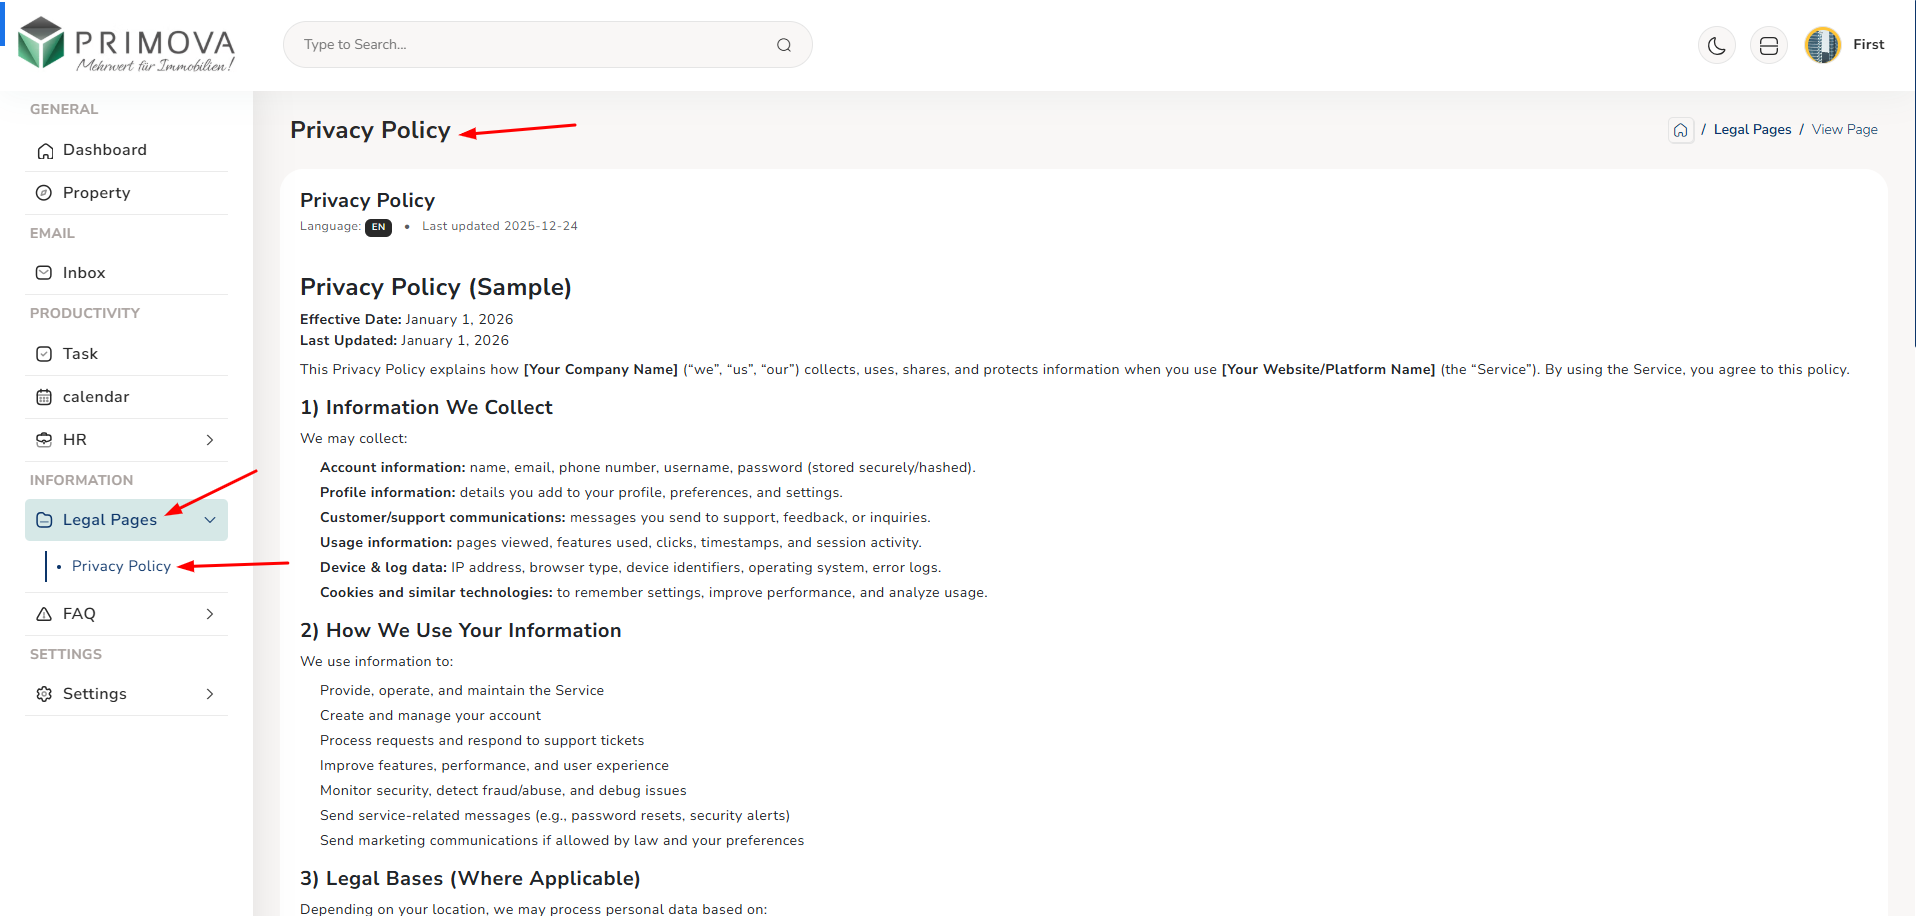
Legal Document View - Full Content
Read complete legal document with formatted text, sections, and subsections. View document title, category, publication date, last updated date, and full content. Professional formatting makes documents easy to read and understand. Option to download as PDF for offline reference. (Click image to zoom)
Available Legal Documents:
- Employment Terms: Your contract and conditions
- Code of Conduct: Workplace behavior and ethics
- Privacy Policy: Data protection and confidentiality
- Health & Safety: Workplace safety regulations
- Leave Policy: Vacation and leave rules
- Disciplinary Policy: Procedures for misconduct
- Grievance Process: How to file complaints
- Anti-Harassment: Workplace harassment policy
- Equal Opportunity: Non-discrimination policy
- IP Policy: Intellectual property rights
- Confidentiality: NDA and information security
- Social Media: Social media usage guidelines
- IT Policy: Technology and equipment usage
- Termination: Employment termination procedures
💡 How to Use Legal Pages:
- Familiarize Yourself: Read all legal documents during your first week
- Employment Terms: Review your employment contract carefully
- Code of Conduct: Understand workplace behavior expectations
- Company Policies: Know key policies affecting your daily work
- Leave Policy: Understand vacation rules before requesting leave
- Reference When Needed: Come back to review specific policies as situations arise
- Download Important: Save PDF copies of critical documents
- Stay Updated: Check for updates periodically (last updated dates shown)
- Ask Questions: If unclear about any policy, ask HR for clarification
- Compliance: Follow all policies to avoid disciplinary action
⚠️ Legal Pages Important Notes:
- View Only: You can read but not edit legal documents
- Binding Agreement: These documents form your employment contract
- Compliance Required: Following policies is mandatory, not optional
- Your Responsibility: You're responsible for knowing and following policies
- Updates: Policies may be updated - check last modified dates
- Acknowledgment: Reading policies means you agree to comply
- Questions: Contact HR if anything is unclear or confusing
- Violations: Policy violations can result in disciplinary action
- Keep Private: Don't share confidential company documents externally
Understanding Legal Documents:
- Read Carefully: Legal language can be complex - read slowly and carefully
- Take Notes: Note important points that affect your daily work
- Seek Clarification: If terms are unclear, ask HR to explain
- Know Your Rights: Policies protect you too, not just the company
- Grievance Process: Know how to raise concerns if policies are violated
- Updates Matter: When policies update, read changes carefully
- Document Reference: Note document names when discussing policies with HR
FAQ - Frequently Asked Questions
Comprehensive knowledge base with frequently asked questions and answers organized by category. Find quick answers to common questions about system usage, policies, procedures, and workplace matters. Browse FAQ by category including General, HR, Payroll, Leave, Property, Tasks, Technical, and more. View-only access to help you find information quickly without contacting admin for routine questions.
Key Features:
- Browse FAQs organized by categories for easy navigation
- Search FAQs by keyword or question text
- View questions and detailed answers
- Categories include: General, HR, Payroll, Leave, Property, Tasks, Technical
- Expand/collapse answers for better readability
- See how many questions in each category
- Access common system usage questions and solutions
- Learn troubleshooting steps for common issues
- Understand policies through Q&A format
- View contact information if your question isn't answered
- Recently added FAQs highlighted
- Print or download FAQ sections for reference
FAQ Categories - Browse by Topic
View all FAQ categories with question counts. Click any category to see all questions and answers in that section. Categories include General Questions, HR & Employment, Payroll & Salary, Leave & Vacation, Property Management, Task Management, Technical Support, and more. Organized structure helps you find answers quickly. (Click image to zoom)
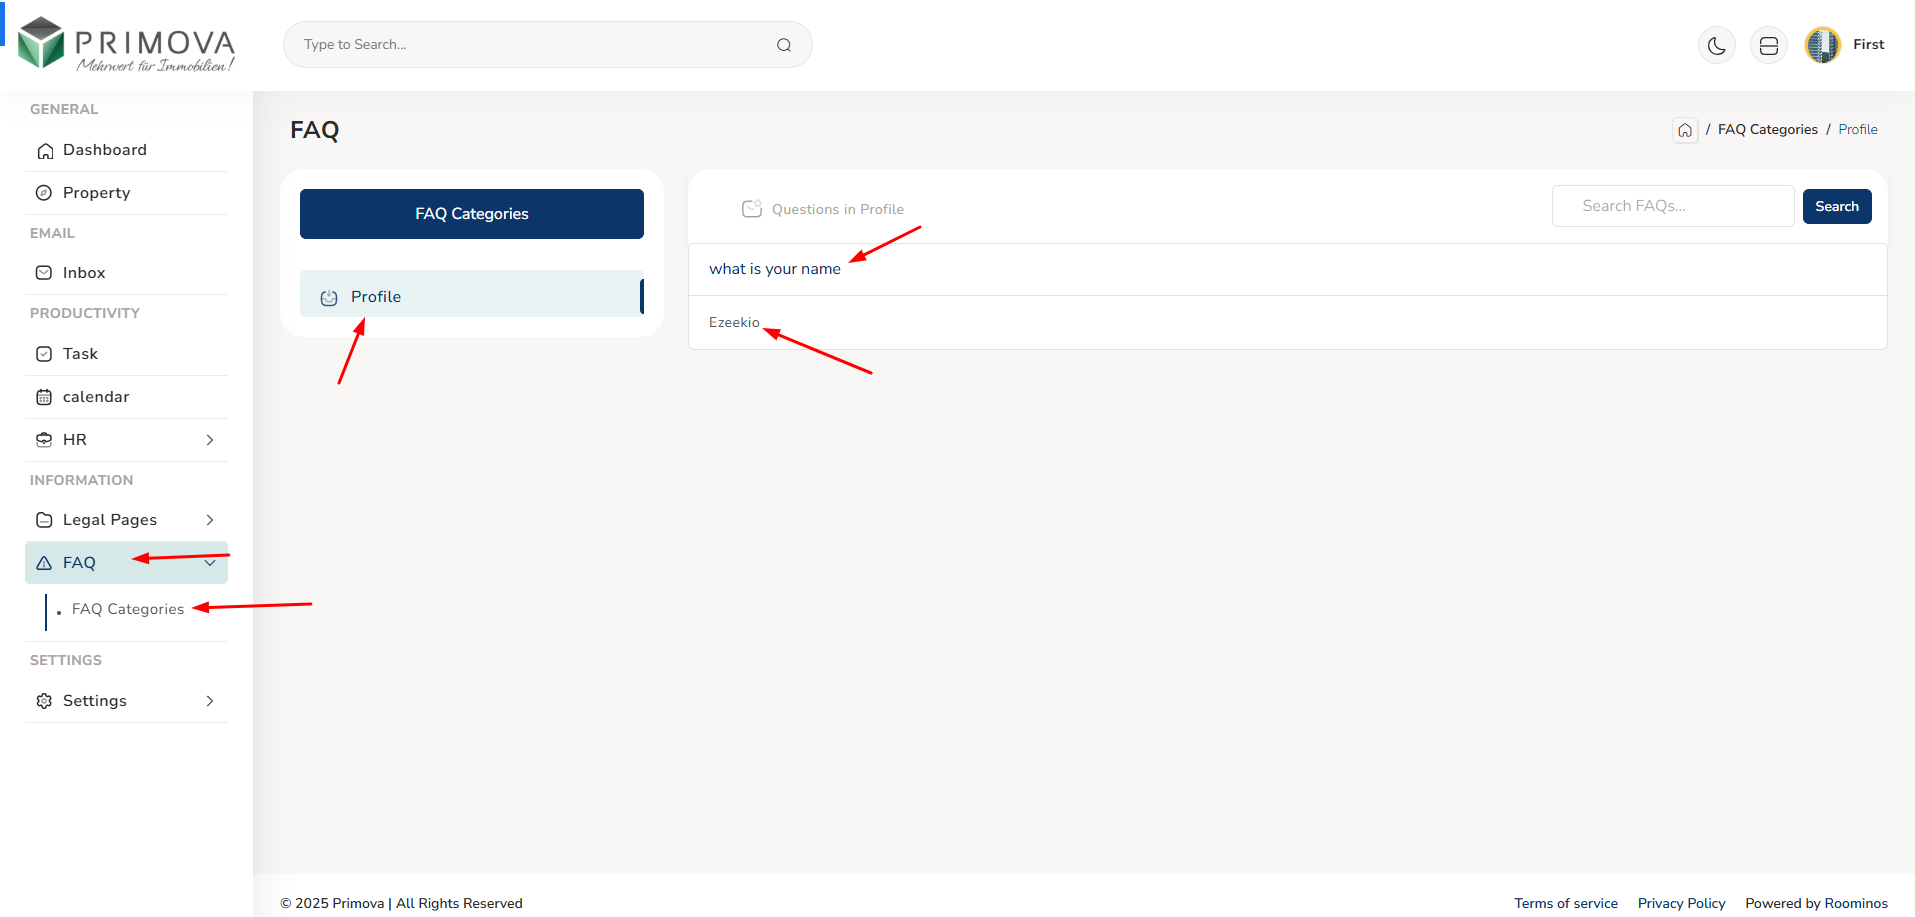
FAQ List - Questions & Answers
Browse all questions within a category. Each FAQ shows the question as heading with expandable answer section. Click to expand and read detailed answer with step-by-step guidance, links to relevant pages, and helpful tips. Accordion style keeps interface clean and easy to scan. (Click image to zoom)
FAQ Answer Details - Comprehensive Help
Read detailed FAQ answers with step-by-step instructions, screenshots, links to related pages, and helpful notes. Answers are written in clear, easy-to-understand language. Many include examples or scenarios to clarify the information. Some answers link directly to relevant system pages. (Click image to zoom)
FAQ Categories Available:
- General: System basics and getting started
- HR & Employment: Employment-related questions
- Payroll: Salary and payment queries
- Leave & Vacation: Leave request help
- Property: Property viewing and listings
- Task Management: Working with tasks
- Calendar: Scheduling and appointments
- Inbox: Email system questions
- Technical: Login, password, system issues
- Policies: Company policy clarifications
- Contact: Who to contact for what
- Troubleshooting: Common problem solutions
💡 How to Use FAQ Effectively:
- Check FAQ First: Before contacting admin, check if FAQ has your answer
- Use Search: Type keywords in search bar for quick results
- Browse Categories: If searching doesn't help, browse relevant category
- Read Carefully: Read entire answer including notes and tips
- Follow Steps: Many answers have step-by-step instructions - follow in order
- Check Links: Click links in answers to access relevant pages directly
- Try Solutions: For technical issues, try troubleshooting steps before contacting support
- Multiple FAQs: Sometimes related FAQs have additional helpful information
- Still Stuck?: If FAQ doesn't solve your issue, contact admin via email
- Save Time: Bookmark frequently needed FAQs for quick reference
Common FAQ Topics:
- "How do I submit a leave request?" - Step-by-step leave application guide
- "Where can I see my payslip?" - Navigate to payroll section
- "How do I update task status?" - Task management instructions
- "Can I view property owner contact?" - Property information access
- "How to reset my password?" - Password recovery process
- "Who do I contact for X?" - Contact information directory
- "How many leave days do I have?" - Check leave balance
- "How to add calendar appointment?" - Calendar usage guide
- "Email not sending - what to do?" - Email troubleshooting
- "What's the company leave policy?" - Policy explanations
✅ FAQ Best Practices:
- Self-Service: FAQ empowers you to find answers independently
- Time Saver: Get instant answers instead of waiting for email reply
- 24/7 Available: Access FAQ anytime, even outside office hours
- Comprehensive: Most common questions are covered in detail
- Up to Date: FAQ is regularly updated with new questions
- Clear Answers: Written in simple language, easy to understand
- Reduces Admin Load: Finding your own answers helps admin focus on complex issues
- Learn System: Reading FAQs helps you understand system better
- Troubleshoot: Many technical issues can be solved via FAQ
- Policy Clarity: FAQ explains policies in Q&A format that's easier to grasp
⚠️ FAQ Guidelines:
- View Only: You can read FAQs but cannot add or edit them
- Check First: Always check FAQ before emailing admin with questions
- Not Comprehensive: FAQ covers common questions, not every scenario
- Contact if Needed: If FAQ doesn't answer your specific question, contact admin
- Follow Instructions: For system tasks, follow FAQ steps exactly as written
- Policy Reference: FAQ is for guidance - refer to official legal pages for policy details
- Updates: FAQ is updated regularly, check back if you don't find answer
- Suggest Topics: Email admin if you think a new FAQ topic should be added
When FAQ Doesn't Help:
If you can't find answer in FAQ:
- Complex Issues: Email admin describing your specific situation
- Personal Matters: Contact HR directly for personal employment matters
- Urgent Problems: For urgent issues, call admin instead of email
- Technical Problems: If troubleshooting doesn't work, report to technical support
- Policy Questions: For specific policy interpretations, ask HR
- System Bugs: Report system errors to admin with screenshots
- Provide Details: When contacting, mention you checked FAQ but need specific help
Settings
History - Check Login Logs
Complete login history and security logs showing all access activity to your employee account. Monitor when and where you logged in, track login attempts, verify authorized access, and ensure account security. View detailed information about each login session including date, time, IP address, browser, device, and location. Essential for security awareness and detecting any unauthorized access attempts to your account.
Key Features:
- View complete login history with all access records
- See login date and exact time for each session
- Check IP address from where login was made
- View browser and device information (Chrome, Firefox, Safari, etc.)
- See operating system details (Windows, Mac, iOS, Android)
- Check geographical location of login (city, country)
- Filter login history by date range (from - to)
- Search logs by IP address or location
- View successful login vs failed login attempts
- See session duration and logout time
- Identify suspicious or unauthorized login attempts
- Export login history for personal security records
- Track login patterns to verify your own access
- Report suspicious activity to admin immediately
Login History - Complete Access Records
Comprehensive table displaying all your login activities with detailed information for each session. View date and time of login, IP address, geographical location (city/country), browser type, device information, operating system, and login status. Each row in the table represents one login session with color-coded status indicators - green for successful logins and red for failed attempts. Use the search and filter options to find specific login records by date range, location, or IP address. Scroll through your complete access history to monitor account security and verify all access attempts are legitimate. (Click image to zoom)
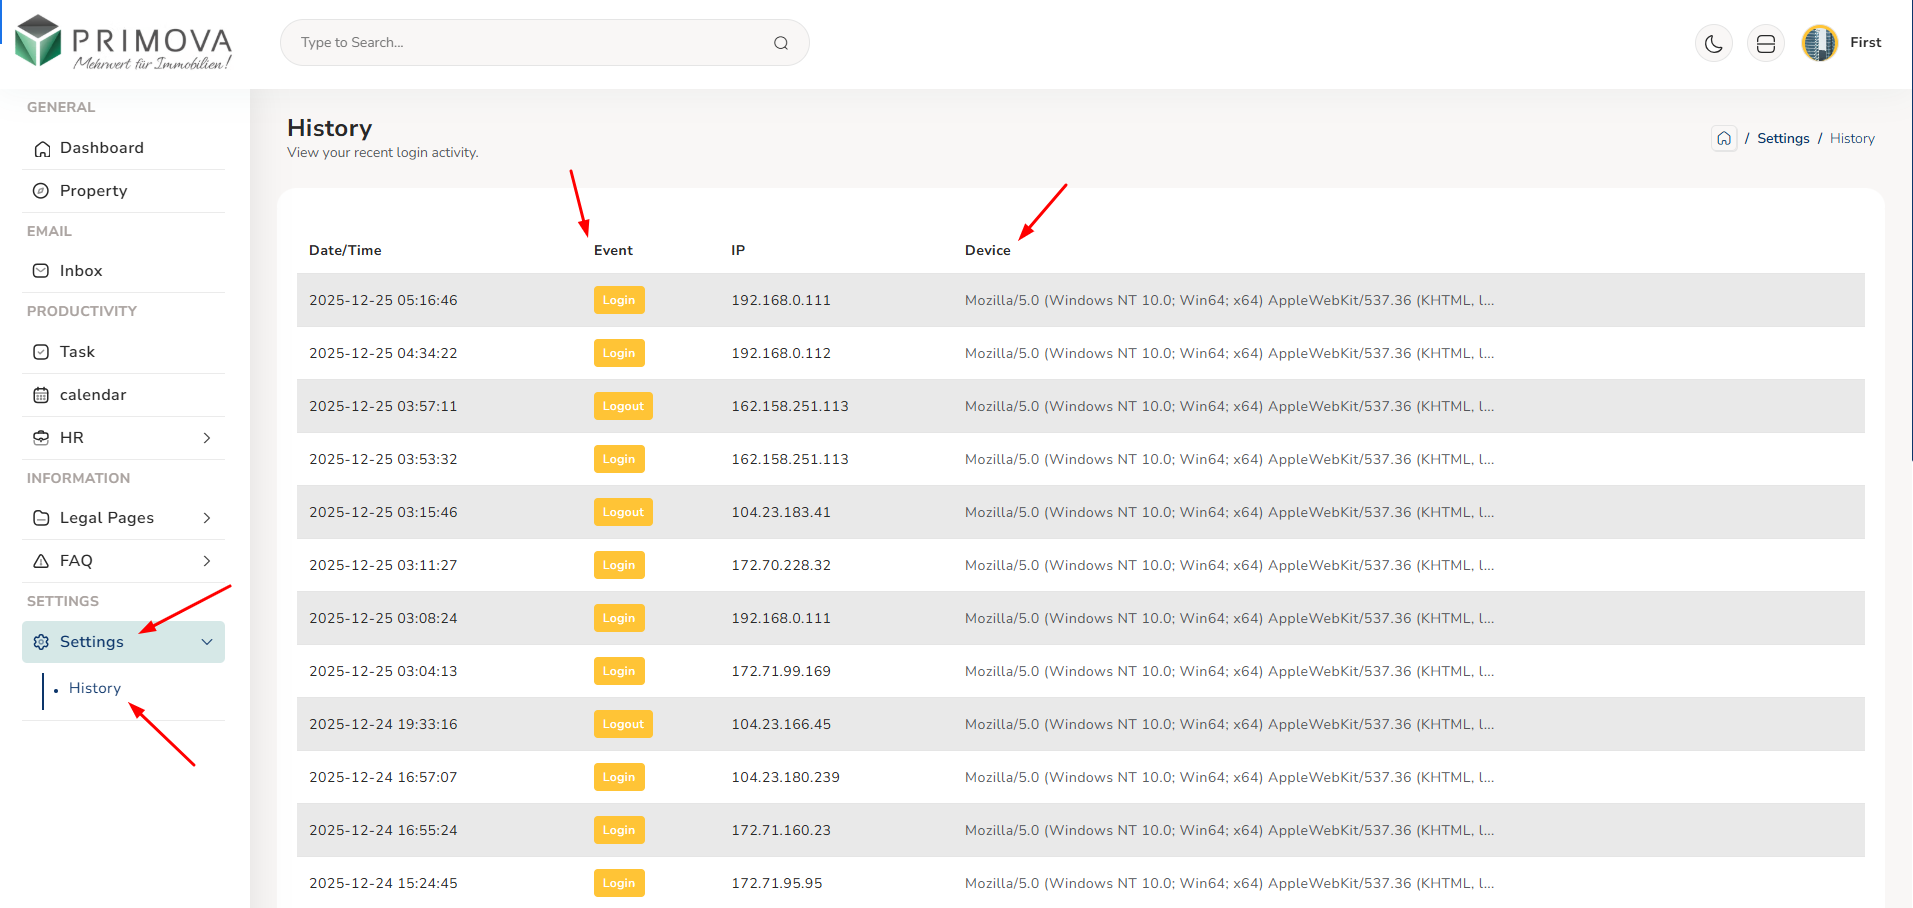
Login Log Information Includes:
- Date & Time: Exact timestamp of login
- IP Address: Internet address used for login
- Location: City and country (based on IP)
- Browser: Chrome, Firefox, Safari, Edge, etc.
- Device Type: Desktop, laptop, mobile, tablet
- Operating System: Windows, Mac, iOS, Android, Linux
- Login Status: Success or failed attempt
- Session Duration: How long you were logged in
- Logout Time: When you logged out or session expired
- User Agent: Detailed browser and system info
- Login Method: Regular login, remember me, etc.
- Security Flags: Any security alerts or warnings
✅ Good Security Habits:
- Weekly Check: Review login history every Monday morning
- Strong Unique Password: Use password manager for strong passwords
- Logout Always: Especially on shared or public computers
- Browser Security: Keep browser and OS updated
- Trusted Devices: Only login from your personal trusted devices
- Secure Networks: Use secure WiFi, avoid public networks
- No Sharing: Keep your credentials completely private
- Report Promptly: Don't wait if you see suspicious activity
- Stay Aware: Security is your responsibility too
- Educate Yourself: Learn about security threats and how to prevent them